Thursday, April 21, 2011

Paper Shredder Ideas...Easter Grass and Other Projects Too!!!

One last quick Easter Project...and other projects below too!


Do you have a paper shredder? You know the ones that shred important documents so all your personal info isn't in the trash for all to see. Well, get that shredder out and do some crafting!


You can shred anything.
  • old paper shopping bags
  • magazines and catalogs
  • old book pages
  • newspapers
  • old gift wrap
  • construction paper
  • those nasty little magazine inserts 

My shredder...well, actually my dad's shredder, shreds it into long strips. Some have the option to cross cut too.

Turn a little pink construction paper into a little Easter grass.


Too cute!


Or how about old book pages.


Love the look of these.


Just take Styrofoam balls and some Mod Podge or white glue and...


start gluing all the strips on to cover. I am in the process of making several of these to fill up a pretty bowl or basket for the coffee table.


Don't forget recycled paper for quick and easy packing paper.


How about a pretty colored magazine?


Shred it...


Layer on some white glue or Mod Podge on the strips and roll the strips over a nail or screw.


Let it dry.


and now you have a great bead for jewelry making.


I love my shredder...uh my dad's shredder. Maybe he won't miss it. Shhh, don't tell him!!

Have a great day,
~Karen~

Thoughts on Thursdays...

Did you ever have one of those days where you just HAVE to run out of the house for a "quick errand", so there is no time to shower...you'll do it when you get back! Well, I think if you put on a little lipstick and silver hoop earrings, you feel less greasy. I'm just saying!! LOL

I'm off to shower now,
~Karen~

Wednesday, April 20, 2011

Easter Decor...I Love Spray Paint!

A yummy chocolate Easter Bunny right?


No...and old ceramic bunny I bought for 75 cents in a consignment shop a few years ago.


It's been in a box waiting for the right thing to do with it...then I found this great spray paint.


This is how it sprayed on...with that nice satin finish. I didn't do anything else.


I found the paint in Walmart...it's for outdoor spaces. It sprays on so nice and evenly. Great coverage fast.


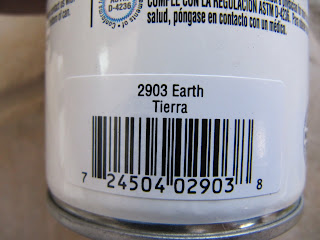
Here's the color.


He looks so yummy, I want to bite his ear off!!


Go through your Easter decorations that you haven't used in years and see what a little chocolate paint can do!

Have a great day,
~Karen~

Monday, April 18, 2011

Tool Time Tuesday...Easter Egg Hunt Idea

Happy Tool Time everyone. Continuing on from yesterday's eggstravaganza with another little Easter project.

Each year we have a big Easter egg hunt at our house. All the kids from both sides of the family. My dad treats all the kids by giving me money to put in all the eggs. We also put lots of candy in there too!!

To make the egg hunt fair for everyone, I have always color coded each child. Each person picks what color they want and that's the color they have to hunt for. To help them remember what color they have, I've given them baskets or bags that match their color.

This year I made them buckets...recycling style.


These are the cans that I collected for a school fundraiser last year. We used them for flowers for centerpieces. They are 7 inches high and...


6 inches wide. They were free from a few of our local pizza restaurants. Just ask them to save them for you. Tomato sauce comes in them. The inside edge isn't sharp at all on these, must be how they opened them. Make sure yours our not sharp for little hands. Maybe add duct tape on the edge if it is.


Now just match your spray paint to the egg color.


Before you paint, you will need to poke holes in the sides of the can for the handles. You can bang a nail in there...


but make sure you file down this sharp edge on the other side.


Drilling the hole doesn't really make the sharp edge, but smooth it off if it is.


Now spray away. Make sure the can is upside down.


You can also use craft paint, but it took a lot of coats and was spotting in places. I just didn't want to go out and buy Hot Pink spray paint!


Here's the hole from the drill.


Thread your ribbon or string from the inside to the outside with both ends. You want the knot on the outside to cover up any sharp edges you may have left.


Now go hide your eggs, so the kiddies can fill up their cute matching buckets.


Definitely going to repaint that green one...looks way too dark in this picture! LOL


Great FREE project, because I had all the paint.


Just need to paint some more with polka dots on them, because we have more than 6 kids for the hunt. The eggs have black polka dots and so will the can.


Hope you have an Eggstra special Tuesday...I couldn't resist. I'll stop! In eggsactly one more day. Sorry, could help myself.
~Karen

Sunday, April 17, 2011

Keurig K Cups...or Keur-Egg K Cups?

I have a few Easter ideas that I will be sharing in the next few days...even on Tool Time Tuesday. This project today is great for recycling.

This idea uses Keurig K cups. A "K" cup is used to brew coffee very fast in a certain machine. Each Keurig K cup is a cup of coffee. Needless to say, you can collect those cups very fast.

Don't have a Keurig Machine to collect those K cups? You can ask so many people to save them for you...
  • friends and family
  • doctors office have them in the waiting room
  • our veterinarian has them
  • automotive oil changing places have them too
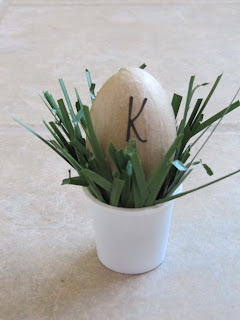
This is my Keur-Egg Easter K cup.


The K cup is punctured from the top and bottom to brew the coffee.


Just peel away the foil and pull out the coffee grounds and the small filter inside, if it has one. Wash.


You could actually add soil and grow your own real grass, but this is my artificial version.


Add your decorative Easter egg...this is a paper mache egg from a craft store. I just left it natural.


Maybe take some scrap booking letters...


and monogram the eggs. You can even write the person's name on the egg.


Great for place settings at a party or Easter Dinner!


You can even use the colorful plastic eggs.

For this idea you will need an awl or ice pick, a lighter and a block of wood to form a whole in a plastic egg. Some eggs come with a hole on the top already.


Heat your awl or ice pick with a match or lighter. It doesn't take long...just a few seconds.


Poke it through the pointy top part of the plastic egg from the inside to melt the hole.


See the tip poking out. You will need it as large as the diameter of the wire which I forgot to tell you that you need. LOL

Take your wire and loop it around your pliers to form a few rings close together.


Now stick it through the hole in the egg.


I added a mini Reese's peanut butter cup to weigh down the egg and to stick the wire in.


Just make a little sign or name for a place setting.


Come back tomorrow for another Eggstravaganza...
~Karen~

Wisata Danau Toba - Sumatera Utara

Danau Toba adalah salah satu destinasi wisata alam terbesar di Indonesia dan terletak di Sumatera Utara. Ini adalah danau vulkanik terbesar ...