Saturday, October 15, 2011

Instant Wrist Support For Computer Mouse...

You know that if I do something, even something small, I'll take a picture of it and share it with you. Well, here is a quick and easy wrist support I came up with when I was on the computer for a long time and my hand started to bother me.

Works like magic!!

I already had the note pad...


Supports my wrist perfectly now.


and you can tear away pages to fit your wrist and hand!


Quick and easy...give it a try,
~Karen~

Friday, October 14, 2011

Banoffee Pie...But With Coconut

Hello Ladies...it's recipe time!!

Remember last week's Thoughts on Thursday major discussion on sweetened condensed milk? Click here to re-read it, but in short it seems to be our favorite food group.

Well, Angela from United Kingdom, sent me a FABULOUS recipe for Banoffee Pie. Angela is from the blog Tracing Rainbows...click here to visit her!

Banoffee is short for bananas and toffee. I was making the pie for work and the vote was no bananas, so I used toasted coconut instead.

As Angela warned me...I am not responsible for cavities or inches added to your waistline. Recipe is below.

Here it is all dressed up! I took pictures of it like it was a new member of the family. Lol !!!


I used a spring form pan, but you could use a pre made graham cracker pie crust. This is before all the toppings


She is thin, but deadly...


Get your forks ready ladies...


This picture cracked me up, because the close up looks like I used a huge meat fork to eat this!


Here is the recipe Angela sent me, but I converted it from grams to cups. Worked great for me.

Banoffee Pie

Crust:
one store bought graham cracker pie crust or... 

make your own with:
2 cups graham cracker crumbs
1 stick butter, melted
2 Tablespoons sugar

In a small bowl, mix together crumbs, sugar and melted butter. Press firmly into bottom of greased spring form pan and up the sides about 1 1/2 inches. Chill in refrigerator while making filling.

Filling:

7 Tablespoons butter
(the conversion for the butter was from 100 grams...one stick of butter is 8 Tablespoons, so I think one whole stick verses 7 Tablespoons won't hurt!!)
half cup packed brown sugar
1 can sweetened condensed milk

To make filling:
In a sauce pan, mix butter and brown sugar until melted and sugar dissolves. Add the can of sweetened condensed milk and bring to a boil, stirring constantly. When the caramel has started to boil, remove from the heat and pour over chilled graham cracker crust. Cool, then chill in refrigerator for 1 hour until firm.

Topping:
Top with whipped cream and chopped bananas for the true Banoffee Pie
or I toasted coconut and used that instead of the bananas...
or use both!!!

Here is the link to the original recipe Angela sent me if you'd like to see it:

http://www.carnation.co.uk/recipes/pies-and-tarts/banoffee-pie?utm_source=google&utm_medium=cpc&utm_term=banoffee%20pie&utm_campaign=Champion%20Recipe%20-%20Banoffee%20-%20Exact

It's delicious!! Easy and will be a new family favorite.

~Karen~

Thursday, October 13, 2011

Thoughts on Thursday...

First off...Wow, did last week's Thoughts on Thursday strike a nerve. I guess that post brought a lot of sweetened condensed milk lovers out of the closet. Lol !!!

This Thursday...kind of boring, but I know it will bring out the comments.

IRONING !!!

I do the laundry and then put the clothes away. Then each morning or before I need the clothes, I quickly iron outfits for hubby and me. Quick, easy and only a few minutes out of the morning instead of hours ironing everything in one day.

My thinking is...if I wash and dry them, then iron them before I put them away, they will get all squished in the drawer or the closet.

When do you iron...or do you iron at all?

ps...I try to catch the dryer as it stops so they are nice and wrinkle free, but I'm always too busy and I forget. Mine are nice and wrinkled out the dryer!! Too many "irons" in the fire I guess.

Have a great Thursday,
~Karen~

Tuesday, October 11, 2011

Blog Buddy...What Is Navbar and How To Change The Color


Welcome to another Blog Buddy post. Click the Blogging Tips button under my title for more tips and tricks.

Today's feature is about Navbar...what the heck is Navbar you ask?

It's that bar at the top of every blogger blog. I will explain what the Navbar does at the end of the post, but first I'll show you how to change the color of that bar.

I changed the color of mine a long time ago to "match" my blog. Well, not match because I picked "transparent", that just means the color of your blog shows through the bar.

Here is a picture of the Navbar circled on my blog.


To change the color...
  • go to your dashboard
  • click the design button


See that Blue Navbar? Click the "edit" button I have circled in red.


Another screen will pop up and you can pick one from a handful of colors.

Always click save after you pick your color.


Ok, now onto what the Navbar does...from left to right
  • the orange B brings you back to your dashboard if you are logged into your account
  • the empty box is a search box for the blog you are on...I just learned this recently....omg who knew! Just type in what you are looking for and it searches the labels of that person's blog!
  • the "share" button lets you share that blog with other people on social networks.
  • "Next Blog" brings you to a random blog that has just been updated.  
Hope this makes blogging a little easier when searching for something on a blog and makes it color coordinated too!!


Happy Blogging,
~Karen~

Monday, October 10, 2011

Tool Time Tuesday...Summer Trick To Halloween Treat!!

Here's a quick and easy transformation with a sale item from the summer clearance section...


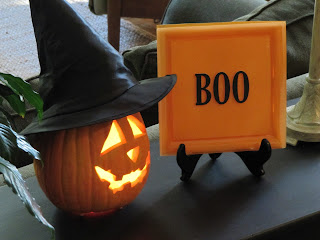
I found these plates at Walmart for 75 cents for 4 plastic plates. Plastic plates can be found any where, in any color, so this idea is great for any holiday.


Just add scrap booking letters and you have a quick wall decoration.


One word on one plate...or...


Spell out the word on several plates. This would be great on that long narrow wall that you don't know how to decorate.


I found these chip board letters in a consignment shop, but I'm sure something similar is in craft stores.


The black chip board letters had stickers on them already!


Perfect for a little wall decor...just hot glue a hanger on the back.


Great in a plate stand too.

I know pumpkins decorated as witches don't say BOO, but I thought BOO was cute!!


Don't forget to look for some tricks in different places, so you can make some treats. Remember...think outside the box.

Happy Tuesday,
~Karen~

The Nester Club...Miscellaneous Tips and Tricks


My nest was full for a little bit this weekend. If you want to join the The Nester Club, click here to read the first post. You can also click here to read all the posts for The Nester Club...so many great comments too. You might find some one in your same "nester" situation!


It is a long holiday weekend here in the states, so both our daughters, Courtney and Kelsie, came home for a few days. Love them to pieces and love it when they're here. They left last night, so the nest is empty again, but we did a lot in a few short days. We had a big dinner at home, stayed up late watching tv, sewed, colored hair, went out to dinner etc...

One project we did was make the girls new scarves...I found fabulous silky fabric at Walmart for $1.50 a yard. It's great!!

Here's the TIP...use your tile floor for
  • squaring up fabric
  • measuring
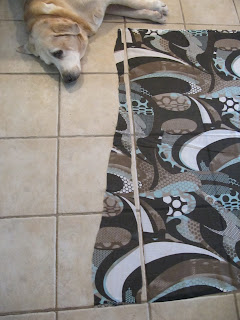
Here's the fabric laid out on the tile floor (Annie the dog helped). See the "cut" edge from the store? Nice and straight huh? Lol !!

Line up your selvage edge (the finished edge of the fabric) on the horizontal grout line of the tile...


Here is Kelsie, my trusty assistant, pointing to the vertical line.


Use the vertical grout line to cut a straight line.


Here it is all cut away and straight!!


Now to measure.

I roughly needed 2 yards per scarf. Each tile on my floor is a little less than 12 inches...plus the grout. Just count over 6 tiles for 6 feet or 2 yards!!

See Kelsie cutting way down there to the right using the grout line again?

Just sew a hem on the 2 cut ends and you're done...INSTANT scarf! I left the selvage edge alone, because it's already finished.


Here is Courtney modeling the scarf. Kelsie wasn't "picture" ready yet!!

Courtney said...please don't take a picture of my face...


Sorry, couldn't resist...too pretty!


Here is some extra Nesting Club FYI...

Courtney had a gift certificate to the Red Door Salon. She wanted to color her hair red! Her hair is brown, but auburn hair is in our family, so it wasn't a scary step.

This was the best picture showing the red...isn't it pretty? The shadows are blocking the full red though.

$90.00!!! It was $75.00 to color it and they automatically add in the tip! Thank God for gift certificates or she would have NEVER done it.


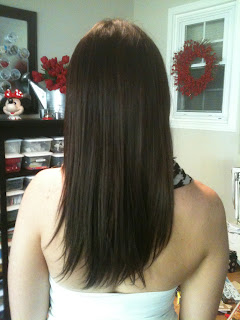
Here is Kelsie's hair we colored this weekend. She wanted to color over old blond highlights she had done at a salon a long time ago. She wanted her natural dark hair back...

Here's the before with older high lights..


Here's the "after". Looks good huh?...$7.00 from a box!! Beautiful! Next time we need a front picture too.


Here's the box...only took 10 minutes!


Medium Brown #21...


What happened in your Nest this weekend?

Have a great day,
~Karen~

Sunday, October 9, 2011

I've Finally Joined The Rest Of The Planet...


"f" is for facebook...and I've been avoiding it like the plague. It seemed like one more thing to keep track of or "do". However, I've created a facebook "page" for Sew Many Ways.

It's not like a regular facebook account...a page is short, sweet and not a lot of extra work at all.

I've added a "like" box over on my right side bar, under my follow section. I'm shamefully begging for likes LOL!!

We'll see where this new venture takes me...probably crazy town.

Trying to keep up with the world,
~Karen~

Wisata Danau Toba - Sumatera Utara

Danau Toba adalah salah satu destinasi wisata alam terbesar di Indonesia dan terletak di Sumatera Utara. Ini adalah danau vulkanik terbesar ...