Sunday, November 14, 2010

Let's Have A Recipe Party...

We all love a new recipe...a new dessert, main dish or even a casserole, but we love them even more around the holidays. That's why I'm hosting a recipe linking party. Starting Sunday November 28th and on into December, you can stop by here and link to the party with a recipe post that you've done on your blog.

If you've never been to a linking party, it's very easy. First, you will write a post about the recipe you'd like to share with everyone on your own blog. Write out the recipe with all the ingredients and directions...pictures are always wonderful too. When the party begins on November 28th, you will fill in 3 quick steps...the url address to the post of your recipe, the name of the recipe and your email address (the address is not visible to the public). Finally, you'll pick one of the pictures from your post for the linking icon...and that 's it! A linking party is a great way to share ideas, but it's also a great way for new people to stop by and visit your blog too.

Hopefully when we're done, there will be hundreds of new recipes for all to enjoy!! So let's all go through our recipe boxes and pick out a favorite recipe or two. You can link up more than one recipe or use previously posted recipes from your blog. The post on your blog can be written at any time, it doesn't have to be on the day of the party.

Spread the word... because the more the merrier!! You can steal the picture below or the button size on the upper right side bar.

Can't wait to see everyone on November 28th!!
~Karen~


I used a free blog background to make this button.
The background is from The Cutest Blog On The Block,
so stop by there for great ideas.

Monday, November 8, 2010

Tool Time Tuesday...One More Place Mat Idea

Are you tired of place mat projects yet? Click here for past projects. This is the last one...I think! Here's is a quick and easy idea for a little fall decorating or something for Thanksgiving here in the states. It's still fall here even though I woke up to snow this morning here in New England! This idea is great any time of year, just change the color of the place mat and the pretty things you place inside.


You need one round place mat. This one is chocolate brown in color, even though the picture is dull. It's made of straw like material and very pliable, not ridged.


Here's a better idea of the color and the size.


Roll the place mat into a cone and temporarily hold together with clips


Hot glue in the over lapping area. Hold in place until dries...just a few seconds.


Now you are ready to fill with any thing from flowers, leaves, berries...


I also hot glued on a little hanger. If you use a fabric place mat, you could sew this on too.


Before filling with your decorations, I filled the point with a little tissue paper to take up some of the space in there. Not necessary, but helped with some of the flowers I used.


Here is the first idea...filled with fall berries and hung next to the fireplace.


Then I decided to add a bow.


You could also hang it on your door.


Trimmed the bow tail a little.


How about a bouquet of colorful leaves?


You could also place it on your table as a center piece...leaves and acorns


or just leaves...maybe even small pumpkins and gourds would be cute.


This is a very inexpensive project and can be used any time of year. Most place mats that I use are only $1.00-2.00 each. Think ahead for Christmas too. A beautiful green place mat with colorful red berries and evergreens from the yard...ok maybe you'll be seeing more place mat projects in the near future!!
space
Have a great Tuesday,
~Karen~

Candle Sticks and Lamps...

Here are a couple quick ideas with candle sticks and candle stick lamps...

Take an ordinary candle stick with a candle in it and add...


a mini chandelier lamp shade.


Just place the wire that was for the light bulb over the candle.


Quick and easy dress up for a plain old candle.


Here is a real candle stick lamp...the kind that uses a light bulb.


I don't use this for a lamp any more.


What I do use it for is a wreath. Just wire the wreath to the top of the lamp and...


Tah Dah! A very inexpensive wreath holder. The stands you buy in the store are way too expensive for me!!


Hope you liked these 2 quick ideas for decorating.
space
Have a great day,
~Karen~

Sunday, November 7, 2010

Blog Buddy...Link To Your Profile Picture

Here is another post for the Blog Buddy feature. Click here for past posts.


Remember the last post I did about trying to link your blog to your profile picture. If you are new to my blog, I am determined to figure out why some of us have a link to our blogs on our profile picture and some of us do not.

Well, with the help of Marni from Sassy Sites and Regan from Floating on a Quilted Cloud, I think there is an answer...

First, find out if you are missing the link to your blog on your profile picture. Do that by going to a blog that you just followed, click on your picture and see what pops up. The first thing should be your "About Me"desciption, a link to your blog name, your recent activities and then a list of blogs you follow. If your blog name is there with a link...your job is done. If it isn't, try the following:

  • click on your profile picture again
  • below is a picture of what it looks like
  • in the upper right hand corner, click on SETTINGS.


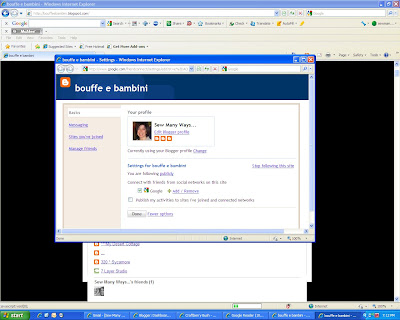
Then another screen pops up that looks like this. There will be options...like Google or Yahoo. Pick Google (Google owns Blogger). Mine already had links to it, so it doesn't say what yours might say. Then hopefully you can pick: Add Links. That's where you would pick or add your blog link.


I hope this works for you. Try it out and let me know. I can try and find your profile picture and check to see if your new link is there.
space
I also want to thank Amy from Ente Gans for teaching me how to capture a picture of my computer for a picture in a post. Much better than trying to take a picture of it with my camera! Thanks Amy.
space
I also want to share the blog that is at the top of those 2 pictures above. I just followed bouffe e bambini...wonderful site with great on going give aways and great recipes!!
space
Good Luck,
~Karen~

Wednesday, November 3, 2010

Holiday Place Card Update...

I finally found the notes I jotted down of ideas for the Place Card post I did yesterday. I knew I had others I wanted to share...2 more ideas and another idea for labeling creams for coffee on a holiday buffet table.

The first place card holder is an easy one made with candy canes.


You just need 3 of any size..these are the tiny ones.


Hot glue 2 of them together, so the hooks are positioned to hold the place card...almost like an easel.


Close up of hot glue.


and here is the third candy cane for support so it can stand up on it's own.


Top view.


Add a little ribbon.


and you're done!!


These would be great for dinner place cards or labeling food on a buffet, but extra cute for the "kids" table. Remember the kids table when you were younger. They need cute things too, but just tell them they can't eat these.


How about a beautiful piece of fruit...apple, pear, pomegranate.


Just stick in 2 floral picks or paper clips to hold the card.


Here is another great entertaining idea that I use for parties. Labeling the milk or creams for the coffee station. These are old fashion milk bottles, but this idea would work for any container.


Little I.D. bracelets.


I just threaded lettered beads onto twine and tied it around the neck of the bottle.


I do this because everyone has different tastes or diet restrictions, so this makes it easy.


They sell these beads in any craft store or you can buy them on line too. I liked this natural wood look,


but these little white ones would be cute too.


Have fun looking around for items that you can re-purpose into a place card holder. You'll be surprised what you'll find that will work great.
space
Take care,
~Karen~

Monday, November 1, 2010

Tool Time Tuesday...Holiday Place Card Holders

It's Tuesday again and you know what that means...fun things to make!! I'm trying to make these next few weeks of TTT holiday crafts. I know I'm early, but I never have time to make anything the closer it gets to December, so why not join me in some early handmade gifts or things for your home. I'll have gift ideas to put together at the end.

I am going to clarify one thing before I begin this post. I LABEL EVERYTHING...even my coffee pots. You'll see in a minute. We have most of the holiday functions and parties at our home. Both my family and my husband's family get along so well and have a great time together. When we have everyone for Thanksgiving and Christmas and Easter there can be over 45+ people. To keep things flowing and organized, I label the food and the drinks.

Here are a few examples of Holiday place card holders that you can make to label your next party. If you have a small dinner party, having place card holders for each person is great. For me, with that many people, I just label the edibles LOL!!

Let's make our first set from ornaments. These are from Walmart. They are the plastic non shattering kind.


$1.00 for a set of 4!!


Love the red, but they have so many other great colors too! This picture shows the problem with using an ornament...they're top heavy.


Here's the fix. These are curtain rings, found in the sewing section. You know those little rings on the back of a Roman shades where all the strings go through.


You can also use washers from the hardware store...you knew I would get a hardware store item in a TTT post.


This is a small thin key ring...you'll see this in a minute.


First try out which ring you need to use on the bottom of your ornament, according to it's size.


Hot glue it on. Make sure you place it directly in the center of the bottom or it will be wobbly.


Open up the key ring and thread it through the top of the ornament.


Here it is standing on it's own, but the key ring needs to be standing up too.


Position the key ring, making sure the part with the 2 parts of the metal are at the top.


See the 2 parts there?


Now just squirt a little hot glue in there and hold in place until it dries.


All done!!


If you don't have a key ring, you could take the 2 washers and glue them on together at the bottom.


Just make sure you leave the top part unglued, so the card can fit in there.


Now here comes the labeling part. I only printed of few for examples, but you can label anything from the dishes you are serving on a buffet, to whether that is milk or cream in the pitcher next to the coffee. Believe it or not I serve milk, half & half and cream at the coffee station. I have another tutorial on how to label them coming up soon.


Are these not the cutest. I make three different 30 cup pots for hot drinks...one regular coffee, one decaf and one hot water for tea. These work great for that.


Just slip the card between the 2 metal rings of the key chain.


Cute if you add a little tree next to the coffee pot too.


and here it is as a place card for each person at the dinner table. Guess I'm the only one coming to this party...LOL!!


You can also buy different shaped ornaments like this one.


It was made of Styrofoam, so I used floral pick for this one.


Just stick it in.


and the card rests up against the floral pick.


Here's the back. You could also wrap a little box and do the same thing!!


This is an easy one. You could really add some decorations to this if you'd like. Maybe a ribbon.


I left it plain to show you it is just a business card holder from the clearance rack.


How about a paper clamp.


or how about a spool of thread for a sewing party!! I used 2 floral picks stuck in the paper.


Too cute...


and last, but certainly not the least...you can take scrapbook paper, fabric, note cards or last years Christmas cards and make a simple folded card holder. For the fabric you could just fuse two pieces together or fuse or glue a piece to some card stock.


I used a Christmas note card.


I cut mine 4 inches x 4 inches, but you can experiment with yours.


Fold in half design towards design.


Now take the top edge and fold it down to the bottom folded edge.


Like this...


Flip it over.


and fold down the other top edge to the bottom. The front edge of mine looks crooked, but the card was scalloped in the front.


Just place your card in the fold.


Just perfect and this one is free!!


If I think of any more, I'll be sure to share them with you. Now don't wait til the last minute to make these. Start them early. They make great gifts too.
  • buy a set of plate chargers, you know those big plates that go under the dinner plate, make or buy a set of napkins, napkin rings and make a set of these place card holders to go with all of it. A great gift!
  • just make a set of the place card holders and have a set of all the names in the family you are giving this too.
  • make some and use it to give a special photo to someone. Place the picture in it instead of the name card.
  • have one in a guest bedroom or your children's room with a little inspiration saying or love note for your hubby or significant other.

Hope you enjoyed this week's Tool Time. Have a great day! Added a few more ideas here!!

~Karen~

ps...see the post I did yesterday on my Blog Buddy series. I need your help!

linking this to The Idea Room, Under The Table and Dreaming and Metamorphosis Monday Parties...join the fun

Wisata Danau Toba - Sumatera Utara

Danau Toba adalah salah satu destinasi wisata alam terbesar di Indonesia dan terletak di Sumatera Utara. Ini adalah danau vulkanik terbesar ...