We all love crafting, sewing, quilting, scrap booking, knitting, embroidery, painting etc and we may dabble in a little bit of everything...however...
if you had to pick just one...what would your favorite be?
Ok, let me make it harder with a crazy story. You are going to be on a deserted island for one year and can only take one hobby (and all the things for that one hobby) with you...What would it be?
Oh, yeah...there will be electricity on this island. Let's not get too crazy with this story! (and my island will have potato chips too)
ONE hobby...ONE snack
Sorry, can't use your computer as your hobby. Lol !!
Mine are...quilting and Pringles chips
Let's hear from everyone to see what the most popular hobby is!!
Happy Thursday,
~Karen~
Wednesday, January 18, 2012

Monday, January 16, 2012
Tool Time Tuesday...File Your Fabric
Happy Tuesday! You all know Tool Time ideas and supplies come from all sorts of places...hardware stores, automotive stores, paint stores, the recycle bin etc. Well, today it's from the office supply...actually the file cabinet in my sewing room, but you can find it in the office supply.
You know they say..."necessity is the mother of all inventions." My necessity is...I needed a new place to store my fabric, because it was getting too much sunlight. However, you know I don't like to spend money!!
Here's what I came up with in desperation to keep my fabric neat, ironed and out of the sun.
Isn't it so pretty?

This is where I keep my fabric now...right out there in the bright light. Click here for a link to the rest of my sewing room ideas

I loved this method too...easy access, fabric is pretty, I can see what I need or have. The only bad part is...if I want that bottom piece, things get a little wonky.

Not to mention that whole wall of windows on the right side of the room streaming in the fabric fading light!

Here's what I came up with.
I have this file cabinet next to my sewing table. On top is set up for a cup of tea when crafting.

Inside it stores all my greeting cards by holiday.

Not for long...this is just the start of my new fabric filing system!!!

The fabric hangs on a Pendaflex Hanging Folder...

Buy the pendaflex folders by the box.

and get your fabric ready!!

Since it's a folder, there are 2 sides...

Open up the folder...

and cut it in half

This is a half yard cut of fabric folded in half, selvage edge on the bottom...

fold in half again...
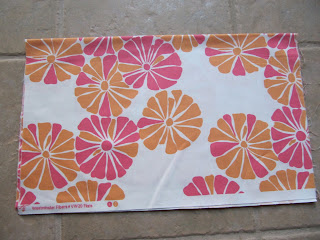
Place on file folder...

and fold the fabric over. The selvage edge will be draping down next to the sides of the folder

Hang in your file cabinet

For longer yardage of fabric, do the same thing by folding it in half and then half again (fold goes to the selvage edge). Your yardage (1,2,3 yards) lays out left to right.

Now just wrap the fabric over the file folder.

If there is a lot of yardage, you may not want to cut the folder in half...having the 2 parts will add strength for the weight of the fabric.

All wrapped up and ready to hang.

Ahhh...so pretty and neat...and safe from the sun. Maybe I should move my tea station though

Now I just need to get my butt in gear and sew something...I think my hobby really is organizing my supplies and not doing anything with them!!! LOL
I also need to be on the hunt for yard sale or thrift store file cabinets!
EDIT...there have been a few comments about the acid in the paper of the folder or the color bleeding. I'm not sure about the color, but the Pendaflex file website has a big ACID FREE sign on the page about the Pendaflex files. Click here to visit their site.
If you are worried about the color of the file, they do sell manila or no color folders or you could just place a piece of tissue or acid free paper between the fabric and folder.
Have a great day and have fun playing with your fabric.
~Karen~
You know they say..."necessity is the mother of all inventions." My necessity is...I needed a new place to store my fabric, because it was getting too much sunlight. However, you know I don't like to spend money!!
Here's what I came up with in desperation to keep my fabric neat, ironed and out of the sun.
Isn't it so pretty?

This is where I keep my fabric now...right out there in the bright light. Click here for a link to the rest of my sewing room ideas

I loved this method too...easy access, fabric is pretty, I can see what I need or have. The only bad part is...if I want that bottom piece, things get a little wonky.

Not to mention that whole wall of windows on the right side of the room streaming in the fabric fading light!

Here's what I came up with.
I have this file cabinet next to my sewing table. On top is set up for a cup of tea when crafting.

Inside it stores all my greeting cards by holiday.

Not for long...this is just the start of my new fabric filing system!!!

The fabric hangs on a Pendaflex Hanging Folder...
- easy to see
- keeps it ironed and wrinkle free
- file by color, designer etc
- out of the sunlight!!

Buy the pendaflex folders by the box.

and get your fabric ready!!

Since it's a folder, there are 2 sides...

Open up the folder...

and cut it in half

This is a half yard cut of fabric folded in half, selvage edge on the bottom...

fold in half again...

Place on file folder...

and fold the fabric over. The selvage edge will be draping down next to the sides of the folder

Hang in your file cabinet

For longer yardage of fabric, do the same thing by folding it in half and then half again (fold goes to the selvage edge). Your yardage (1,2,3 yards) lays out left to right.

Now just wrap the fabric over the file folder.

If there is a lot of yardage, you may not want to cut the folder in half...having the 2 parts will add strength for the weight of the fabric.

All wrapped up and ready to hang.

Ahhh...so pretty and neat...and safe from the sun. Maybe I should move my tea station though

Now I just need to get my butt in gear and sew something...I think my hobby really is organizing my supplies and not doing anything with them!!! LOL
I also need to be on the hunt for yard sale or thrift store file cabinets!
EDIT...there have been a few comments about the acid in the paper of the folder or the color bleeding. I'm not sure about the color, but the Pendaflex file website has a big ACID FREE sign on the page about the Pendaflex files. Click here to visit their site.
If you are worried about the color of the file, they do sell manila or no color folders or you could just place a piece of tissue or acid free paper between the fabric and folder.
Have a great day and have fun playing with your fabric.
~Karen~
Sunday, January 15, 2012
Shoepeg Salsa Recipe...
Happy Monday everyone...I hope you had a great weekend. There was lots of football at our house. If there is any kind of gathering at our home...no matter the size...we always have this bean and corn salsa.
This recipe makes a big bowl, but this was all we had left the next day to snack on. Forgot to take a picture of the whole recipe.

Shoepeg Salsa
2 (15 ounce) cans black beans, drained and rinsed
1 (17 ounce) can shoepeg corn, drained. Shoepeg corn is a small white corn.
1-2 avocados, chopped
1 red onion chopped very small
2 large tomatoes, seeded and chopped
1 Tablespoon olive oil
1 Tablespoon red wine vinegar
4 Tablespoons lime juice ( I used the bottled kind...tastes better to me)
1 teaspoon salt
1/2 teaspoon black pepper
Mix all ingredients in a large bowl. Cover and refrigerate. Make ahead so juices begin to flow from veggies...although it does taste great from the start! Serve with tortilla chips.
This is so yummy and healthy too. Only has one tablespoon of olive oil in the whole dish!!
Enjoy,
~Karen~
This recipe makes a big bowl, but this was all we had left the next day to snack on. Forgot to take a picture of the whole recipe.

Shoepeg Salsa
2 (15 ounce) cans black beans, drained and rinsed
1 (17 ounce) can shoepeg corn, drained. Shoepeg corn is a small white corn.
1-2 avocados, chopped
1 red onion chopped very small
2 large tomatoes, seeded and chopped
1 Tablespoon olive oil
1 Tablespoon red wine vinegar
4 Tablespoons lime juice ( I used the bottled kind...tastes better to me)
1 teaspoon salt
1/2 teaspoon black pepper
Mix all ingredients in a large bowl. Cover and refrigerate. Make ahead so juices begin to flow from veggies...although it does taste great from the start! Serve with tortilla chips.
This is so yummy and healthy too. Only has one tablespoon of olive oil in the whole dish!!
Enjoy,
~Karen~
Sew Darn Crafty Party...Week 48
Happy Sunday everyone!! It's mid January...cold in some parts of the world, warmer in others, but no matter what the weather is outside, it still feels like a time of renewal. You feel rejuvenated to do so many things. I want to start new project and finish up old ones...story of my life.
If you've started new projects or finished up old ones...share them here at Sew Darn Crafty. It helps that feeling of accomplishment if you let others share in your excitement and I can't wait to see what you've been up to!!

If you want to add the button to your blog...Click HERE for a tutorial for adding a button
If you're NEW to Sew Darn Crafty, then grab a cup of something tasty, sit back and join in on the fun (starts Sunday and lasts all week long at Sew Many Ways).
WHAT IS SEW DARN CRAFTY...
WHAT IS A LINKING PARTY...
So now we all know what Sew Darn Crafty means, let's explain a linking party again. I subscribe to a linking service, which provides the ability to link thumbnail pictures on my blog. The picture is a link that other bloggers provide to share their projects.
Two things can happen at a linking party...looking and/or linking
HOW AND WHAT TO LINK TO THE PARTY...
Sew Darn Crafty is all about YOU!! Show off your projects, share a tutorial, show us your vacation pictures, share a family favorite recipe...share anything. Not only does linking inspire us all, it also brings lots of new people to your blog for a visit. Click here for past parties and lots of inspiration
Have fun linking up! Don't forget to come back and take a look at all the great projects during the week,
If you've started new projects or finished up old ones...share them here at Sew Darn Crafty. It helps that feeling of accomplishment if you let others share in your excitement and I can't wait to see what you've been up to!!
If you want to add the button to your blog...Click HERE for a tutorial for adding a button
If you're NEW to Sew Darn Crafty, then grab a cup of something tasty, sit back and join in on the fun (starts Sunday and lasts all week long at Sew Many Ways).
WHAT IS SEW DARN CRAFTY...
- "Sew" for anything to do with sewing,
- "Darn" for anything to do with knitting. I always think of darning to do with knitting, but in my case "darn" is similar to the word I say when I mess up crafting!!
- Let's not forget the word "crafty"...which is every thing we create
- ...the dot, dot, dot means you can share just about anything!!
WHAT IS A LINKING PARTY...
So now we all know what Sew Darn Crafty means, let's explain a linking party again. I subscribe to a linking service, which provides the ability to link thumbnail pictures on my blog. The picture is a link that other bloggers provide to share their projects.
Two things can happen at a linking party...looking and/or linking
- you can be greatly inspired by wonderful projects, ideas or vacation pictures (looking) and/or
- you can share what you've been up to (linking)
HOW AND WHAT TO LINK TO THE PARTY...
Sew Darn Crafty is all about YOU!! Show off your projects, share a tutorial, show us your vacation pictures, share a family favorite recipe...share anything. Not only does linking inspire us all, it also brings lots of new people to your blog for a visit. Click here for past parties and lots of inspiration
Easy steps to join in on the fun...
- link up to the specific project post, not your whole blog. Makes it easier to link right to that post and not search through all your entire blog. To find the http address to a specific post, just click on the Title of your post.
- link as many projects as you'd like...old or new
- anything goes...cooking, sewing, knitting, crafts, organizing, remodeling projects, vacations, parties etc...
- visit other links to share some blogging love! You know we all love comments!
- grab a Sew Darn Crafty button for your blog (on my right side bar) or just link to the party in your post.
- the more we share, the more people will join and then there's more inspiration to look at!
- linking is open til Saturday night, so plenty of time to join in
- just click the "click here to enter" button and follow the easy steps
Have fun linking up! Don't forget to come back and take a look at all the great projects during the week,
~Karen~
Friday, January 13, 2012
Bird Nesting Material Update...
Remember the tutorial for this bird nesting material cage? (Click HERE to go to that post.)


Well, look what I found in the tree not far away from the cage...

I'm not saying all the fluffy stuff in that bird's nest is from my nesting cage, but...


my crafting heart hopes it is!!

Save some of your crafting, sewing, knitting scraps and make a nesting cage for your feathered friends.
Happy Friday,
~Karen~


Well, look what I found in the tree not far away from the cage...

I'm not saying all the fluffy stuff in that bird's nest is from my nesting cage, but...


my crafting heart hopes it is!!

Save some of your crafting, sewing, knitting scraps and make a nesting cage for your feathered friends.
Happy Friday,
~Karen~
Wednesday, January 11, 2012
Thoughts on Thursday...
Why doesn't peanut butter wash off the silverware in the dishwasher?
I think the peanut butter has some super power cape against the soap...I know it's oil, but come on, soap and scalding hot water? Why is it still there, caked on like it never went through that one hour cycle of power washing.
Forget about trying to get people (meaning my family) to wipe off the spoon before they plunk it in the washer.
I think I'm going to ban peanut butter in my house...LOL or put the crusty spoon at their place setting when I set the table for dinner!!
I know I'm lucky to have a dishwasher, but I do need it to work a little harder on the peanut butter.
How about you and your dishwasher? Does peanut butter bug you or am I the only "nut" case.
Maybe it's the soap door doesn't open, or spots on the glasses, or when the silverware slips in the big holes in the basket and they stop the rack from rolling, or when you break a glass "in" the dishwasher...maybe I should just hand wash my dishes LOL!!
Happy Thursday,
~Karen~
I think the peanut butter has some super power cape against the soap...I know it's oil, but come on, soap and scalding hot water? Why is it still there, caked on like it never went through that one hour cycle of power washing.
Forget about trying to get people (meaning my family) to wipe off the spoon before they plunk it in the washer.
I think I'm going to ban peanut butter in my house...LOL or put the crusty spoon at their place setting when I set the table for dinner!!
I know I'm lucky to have a dishwasher, but I do need it to work a little harder on the peanut butter.
How about you and your dishwasher? Does peanut butter bug you or am I the only "nut" case.
Maybe it's the soap door doesn't open, or spots on the glasses, or when the silverware slips in the big holes in the basket and they stop the rack from rolling, or when you break a glass "in" the dishwasher...maybe I should just hand wash my dishes LOL!!
Happy Thursday,
~Karen~
How To Decorate A Christmas Tree...
What??? I know, it's January. However, I've had a ton of emails from the Christmas home tour asking how I decorate my Christmas trees. I didn't take any pictures of the process when I was putting UP all the trees, but I did take some last week when I was taking them DOWN...so I just reversed the process.
Here is the Santa Claus tree...click here for the original post on that

To start, I placed the hole tree in the storage container I keep all the supplies in.


The tree stem was too tall and bare looking for me, so hiding it in the container helps.

The tree stand fits perfectly.

Then I just wrapped the base with a piece of quilt batting to look like snow. You could use a white blanket or throw too.

Now here's the process of decorating...lights first. This is a pre-lit tree, but 6 of my other trees are un-lit.
Here are a few light tips...

After lights comes the garlands or beads. I use three different garlands...red wooden beads, red berry garland and the peppermint candy garland I made. Click here for the peppermint candy tutorial.
I go by the 3 to 1 rule...I made this up, but it helps me when I'm buying clearance items and need to know how many I should buy.

The berries I found in the floral section on clearance during the year. Adds dimension to the tree when they stick out from the branches.

Just layer the garlands between each other with a little draping.


See how the berries stick out.

Next comes all the ornaments.

Add different sizes and textures...about 40 balls Click here for Santa ornament tutorial

10 candy canes

20 longer plastic candy canes to add length...bought these a long time ago at Walmart. Love plastic!!

These word ornaments are great too. I use them for fillers after the balls go on for color in the bare spots. A box of them was about $2.00 regular price.

Here's where I start...at the top!

then use your other ornaments to fill in between.

Then I wanted even more fillers, but free ones!! I covered Styrofoam balls with cotton batting to make "snowballs"

Use them to fill in bare spots

Zig zag your way around with these too

Now for more dimension. I found these in the Christmas section of Walmart (where else) but floral sections at the craft store is a great place for things like this too. Don't always think Christmas.

Start at the top and do your "zig zag" thing. Put a few on and stand back...look to see where the next zig is going to be.


These are wires, so they just wrap on the branch very easily.
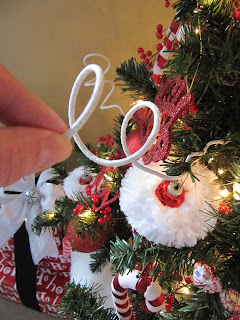
Now the topper...this can be anything related to your tree. I used a Santa hat and those large over sized candy canes that are yard ornaments.

You might have to wire bigger items on at the top.

Add a few fake wrapped presents for decoration at the bottom and you're done.

Here are some quick tips when packing it all away...remember this is the box from the bottom decoration.

I place all the balls on the bottom...they are shatter proof plastic

cover with a layer of recycled bubble wrap.

Bag up small items

Paper towel tube for garland


Liquor box divider for ornaments

All safe and sound...

You can get these liquor box dividers for free.

layer with soft things for protection

The berries are a pain in the hooty...they keep getting tangled. Layer each section with garbage bags.


When you pack your tree away, it NEVER fits in that rinky dink box again. I use a bungee cord to keep it together.

All set for another year...Now where is that cover?!?

Here is the Santa Claus tree...click here for the original post on that

To start, I placed the hole tree in the storage container I keep all the supplies in.


The tree stem was too tall and bare looking for me, so hiding it in the container helps.

The tree stand fits perfectly.

Then I just wrapped the base with a piece of quilt batting to look like snow. You could use a white blanket or throw too.

Now here's the process of decorating...lights first. This is a pre-lit tree, but 6 of my other trees are un-lit.
Here are a few light tips...
- start at the top
- wrap the lights from the inside out to give the tree a little depth
- I use five to six 100 light sets on a 6 foot tree

After lights comes the garlands or beads. I use three different garlands...red wooden beads, red berry garland and the peppermint candy garland I made. Click here for the peppermint candy tutorial.
I go by the 3 to 1 rule...I made this up, but it helps me when I'm buying clearance items and need to know how many I should buy.
- 3 feet of garland for every foot of tree

The berries I found in the floral section on clearance during the year. Adds dimension to the tree when they stick out from the branches.

Just layer the garlands between each other with a little draping.


See how the berries stick out.

Next comes all the ornaments.

Add different sizes and textures...about 40 balls Click here for Santa ornament tutorial

10 candy canes

20 longer plastic candy canes to add length...bought these a long time ago at Walmart. Love plastic!!

These word ornaments are great too. I use them for fillers after the balls go on for color in the bare spots. A box of them was about $2.00 regular price.

Here's where I start...at the top!
- Balls on first. For some reason I always start at the top right and then zig zag my way down, right to left...right to left.
- think triangles as you placing them...see the 3 red balls, they form a triangle

then use your other ornaments to fill in between.

Then I wanted even more fillers, but free ones!! I covered Styrofoam balls with cotton batting to make "snowballs"

Use them to fill in bare spots

Zig zag your way around with these too

Now for more dimension. I found these in the Christmas section of Walmart (where else) but floral sections at the craft store is a great place for things like this too. Don't always think Christmas.

Start at the top and do your "zig zag" thing. Put a few on and stand back...look to see where the next zig is going to be.


These are wires, so they just wrap on the branch very easily.

Now the topper...this can be anything related to your tree. I used a Santa hat and those large over sized candy canes that are yard ornaments.

You might have to wire bigger items on at the top.

Add a few fake wrapped presents for decoration at the bottom and you're done.

Here are some quick tips when packing it all away...remember this is the box from the bottom decoration.

I place all the balls on the bottom...they are shatter proof plastic

cover with a layer of recycled bubble wrap.

Bag up small items

Paper towel tube for garland


Liquor box divider for ornaments

All safe and sound...

You can get these liquor box dividers for free.

layer with soft things for protection

The berries are a pain in the hooty...they keep getting tangled. Layer each section with garbage bags.


When you pack your tree away, it NEVER fits in that rinky dink box again. I use a bungee cord to keep it together.

All set for another year...Now where is that cover?!?

Hope this helps a little. Maybe you can use a few of the tips when Christmas rolls around this year. This post will be in the archives, so when you need it in December, it will be here.
Take care,
~Karen~
Subscribe to:
Posts (Atom)
Wisata Danau Toba - Sumatera Utara
Danau Toba adalah salah satu destinasi wisata alam terbesar di Indonesia dan terletak di Sumatera Utara. Ini adalah danau vulkanik terbesar ...

-
 In my last post about hexagons, I said I had "H.A."...Hexagon Addiction. Now I have H2O...Hexagon Habit Obsession!! Here's a p...
 -
 Hello everyone...this Tool Time Tuesday has some organizing ideas and some sewing storage tips, but all the ideas are from your medicine cab...
 -
 Guavas grow in Mexico, Central, and South America, and have a tangy, sweet, tropical flavor. It contains copious amounts of antioxidants and...