This week's Tool Time is definitely from the hardware store...in the paint section actually. We're using drop cloths today. They come in so many different sizes and different types of canvas and oh yeah...they're cheap. Some canvases in the fabric stores can be $10.00-$15.00 yer yard, if not more.
You can use drop cloth fabric for so many things...curtain panels, bags, outdoor furniture slip covers, pillows, tablecloth etc.
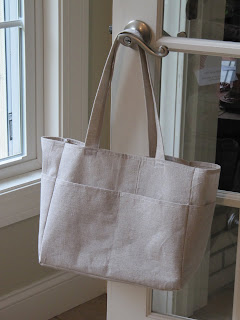
We'll be making this cute little tote bag today. Totally winging this pattern, so no specific measurements, just the concept.
This package is 5 feet by 5 feet and was only $5.00. Even if I paid $12.00 a yard at a fabric store this package would cost $19.00.
The package says...finished hems and leak proof backing. Not all drop cloths have leak proof backing, but the plastic backing is great for purses or diaper bags.
I love the look of this fabric. It's almost a light gray linen look.
Here is the plastic lining. I ironed as I went along with this project on the fabric side and nothing happened to the plastic, but test yours first.
This is how big the piece is.
Here's the tutorial for the tote bag. I started with one piece 12 1/2" by 42" and another 8 1/2" by 42". These are just made up measurement for the size purse I need. Try any size you'd like.
The large one is the body and the small one is the outer pocket piece.
Make sure you cut your 2 pieces using the already hemmed edge. These hemmed edges will be the tops of your tote bag. One step already done for you!
Place the pocket piece on top of the body piece with hems towards the top, both pieces are right side UP.
Run a 1/4 inch stay stitch on the bottom just to hold the 2 pieces together.
Fold over the long piece to join the short edges.
Pin the short side...
and sew with 1/2 inch seam. You can zig zag over this to prevent fraying and add a finished edge.
Now measure over to form the width of the sides of the tote. Pin, BUT only pin through one body piece and one pocket piece.
Take the pinned portion and fold over until pins are on the fold...
Now sew about 1/8 inch from the fold. This is just to form the corners of the tote.
Here is the 1/2 inch seam that connected the 2 raw edges on the right and the other narrow seam on the left.
One side done!
Now to find the opposite side, place the sewn side down...see it underneath in the middle?
Now measure from the right side and...
the left side to make sure there is the same amount of fabric on each side.
Pin down the length of the fabric for both seams
Fold over and sew close to the pins again like the first side seam.
Here's a close up.
Both sides are formed.
Now turn right side out and sew the seams for the pockets that you want. On one of my long sides of the tote, I sewed 2 pockets.
and the other long side I sew 3 pockets.
Now for the bottom. Just measure the width and length and add 1 inch. I used 1/2 inch seam allowance, so that's the extra 1 inch.
Cut out your bottom piece of fabric.
Sew with 1/2 inch seam allowance. I stopped at each corner to leave a 1/2 inch and back stitched a few times and started over. I didn't pivot.
For the bottom support of the purse...here is one more use for those plastic place mats I bought in the clearance rack at Target.
Measure the inside to cover the seams.
Cut out your place mat and in it goes. You can make a little pouch for it with the canvas to cover up the plastic.
Make 2 handles and you are done! Looks a little plain though. So how about a...
pretty little flower! Perfect for summer.
Look how much canvas I have left over. I think I see more projects in the future.
Head over to the paint sections of your hardware store for some fabric, but remember it's our little secret or they will raise the prices.
Happy Tuesday,
~Karen~


No comments:
Post a Comment