Today's feature is about "how do I answer a comment left on my blog?" My blog friend Regan and many others have sent me emails on this, so I thought I would just do a post on how I answer comments and where all my comments go. Well, they go to my blog of course, but they are also all stored in my Gmail and that's what this post is about...Gmail!
First off...I am in no way affiliated with Gmail...even though I will be tooting their horn for this whole post. I just think it's a great way to blog, especially if you have a Blogger account for your blog. As I have said in the past, Google owns Blogger and Gmail is Google's email, so all is connected very well.
The main question I have received about this topic is:
- "how do I answer a comment that's left on my blog? I can go to the comments section on my dashboard or the comment itself...then I bring up the person's profile and then click on their email address. The comment that was left isn't on that email, so it's difficult to write back to that person without the actual comment to refer back to."
In other words, the commenter may not remember what their comment was and now your reply email looks like it's coming from out of the blue!
Here's the solution...well, for me that is!! Gmail
Just a quick over view.
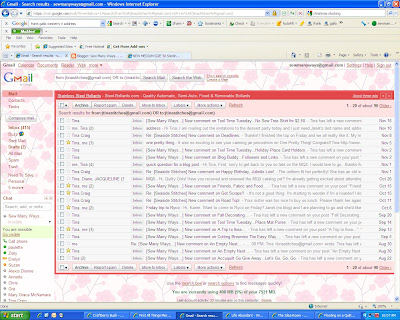
Here is what the Inbox of my Gmail account looks like...click each picture to enlarge. From the top left of the page here are some of the features:- calendar
- google documents
- you can get to your Google Reader (your favorite blog list) from here
- you can get to the web
- and under "other" are so many other things...one of which is PICTURES. This is where all your pictures are stored with Picasa. When anyone posts a picture on their blog, that picture is stored in your Picasa account. Picasa is also owned by Google/Blogger.
Then going down the left side bar is...
- contacts
- inbox etc...
In this picture below, you will see the first three emails are high lighted in black. When it's high lighted, it hasn't been read yet. It shows who it's from, the subject (whether it's a comment on your blog or a separate email, the date and time.

Here is a picture of what it looks like when I click on an individual email. I always use my bestest friend Tina from Seaside Stitches for examples, Thanks Tina!
In the picture, the email tells so much about where it comes from.
- First, is the high lighted title in black
- see where it says "Tina" in red ink (that's just the color I picked, yours may be a different color)...well, you can click that to a link to her Blogger Profile page and then you can click on her blog too.
- Next to that, also in red ink, is The title of the post that she commented on, which was..."Tool Time Tuesday...No Sew Tree Skirt For $2.50". You can click back to the post to see what that was, especially when it's a comment on an older post.
- On the top right where it says, in red ink, "show details"...that is where their email address is located. This is where I also find the dreaded "NO REPLY", which means the commenter doesn't have their email address available for return emails. (see my side for more info on that.)
- then there is the "REPLY" button. This button is the solution to Regan's problem.

When I click on the REPLY button, a sub page comes up...see that bottom half of the email? It opens up with what Tina left for a comment and then the cursor is waiting for me to write a reply. You can link things here or attach a picture too.

See my reply to Tina? Easy, Easy!! Just push send and you're done.

One of the many features for Gmail, which I love, is the "CONTACTS" section. Gmail saves every single address or person that you have had an email conversation with. The memory is endless, so you never have to delete anything.
Go to CONTACTS and find who you are looking for alphabetically...Here's Tina high lighted in green!

Up comes a page that you can fill in their person info...picture, home address, birthday etc...

Then on the bottom left corner you can click "View Recent Conversations" and you can literally bring up every email you have received from that person or you have sent to that person. This is great when you are trying to remember something you said to her or when you first "met" that person through blogging, or whether or not you forgot to email them back about something.
I love this feature! You receive a new comment from someone and you are thinking...hmmm, I know that name from some where! Then you can look back to your contacts page and find out she was in one of your fabric swaps and you shared a pumpkin bread recipe with her! LOL
I'm not sure how every one else receives their emails or how they respond back and forth for comments, but for me this is the easiest way to do it. It's quick, easy, well organized (my favorite part) and the best thing is...signing up for Gmail is free.

I'm not sure how every one else receives their emails or how they respond back and forth for comments, but for me this is the easiest way to do it. It's quick, easy, well organized (my favorite part) and the best thing is...signing up for Gmail is free.
space
You can match your Gmail account name to your blog too. That way people can connect you and your blog through your Gmail name. My Gmail is... sewmanyways@gmail.com Hopefully your name is available when you sign up. Here is a link if you are interested. Click here. Wait for the full page to load.
space
If you do switch your email address to Gmail, make sure you go into you Blog Edit Profile section and change your email address to the new one...and you also have to go to your Dashboard, go to SETTINGS, then click COMMENTS under settings and then fill in the new address in the COMMENT NOTIFICATION EMAIL section. Click SAVE when done! ( Thanks Peg)
space
Ok...I think I tooted Gmail, Google and Blogger's horn enough. They really should give me something for a give away for all of you!! Wouldn't that be fun. Helloooo...Any one from Google Gmail out there? LOL
The next Blog Buddy feature will be "Click, Click, Click"...what happens when you are just Clicking around!
Have a great weekend,
The next Blog Buddy feature will be "Click, Click, Click"...what happens when you are just Clicking around!
Have a great weekend,
~Karen~


