Saturday, February 26, 2011

Organize Your Life...One Spot At A Time!

Spring is coming...I hope...soon, I'm freezing! What does spring mean: spring cleaning, purging, organizing etc. On a whole, it can be a daunting task. The best solution is to take it on...one small project at a time and to do it on a budget is even better.

You've seen this picture of the cabinet in my sewing room before. Those little black and white polka dot boxes are storage bins for all sorts of crafting supplies.


The boxes looked like this when I first made them. I used spray glue to adhere the fabric to the box, but then added a bead of hot glue to the edges, because the spray glue to hold as well


I have since made more and covered them in a different fabric. Remember those are pipe straps from the hardware store for the handles...cheap, cheap!


Our 2 daughters drink a lot of bottled water, so I save every single box the water comes in.


What did I do with all the blue boxes? Well, you know that small narrow cabinet that some of us have in the kitchen...they fit perfectly in there. That cabinet has held so many things, but all the little stuff gets lost in the back.
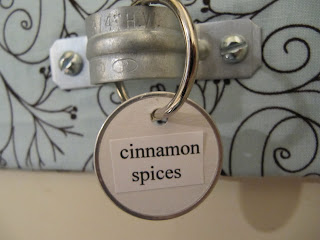
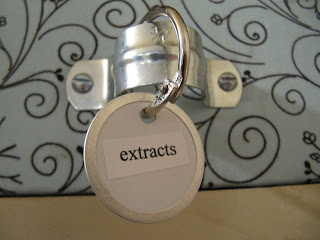
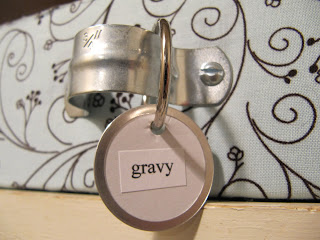
This is now my spice cabinet, with a box for each category.


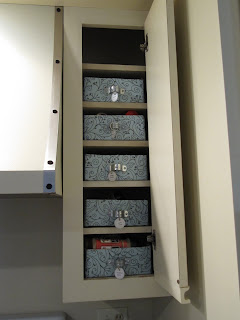
All the little jars and bottles fit in the box and it's easy to pull out the box rather than dig through the shelf looking for what I need.


I had extra boxes for another cabinet too.


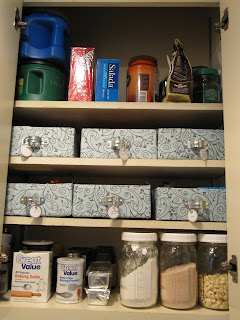
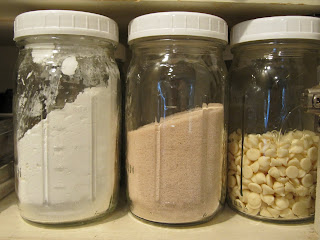
I also use canning jars with the one piece lids. I started using these when that little stinker of a mouse invaded the cabinet and ate all my chocolate chips!


The boxes hold all those little items that can get lost in the shuffle.


The trick to starting a project like this is to...
  • find a container that you use all the time and then start saving them
  • if they need sprucing up (like painting or covering with fabric) do all that ahead of time
  • have all your supplies ready to go when it's organizing time
  • if you start to organize and then have to make all your containers too...it can be too much for one project
  • if the boxes are ready, then the cleaning out of the shelf will go that much quicker
  • adjust your shelves to make the most of all the space in the cabinet too.
  • maybe set aside a little time on one day a week, so you can get through the task faster.

Remember ONE PROJECT AT A TIME and you won't be over whelmed.

I'm hoping to do one post a week to help with organizing...tips and tricks!

Have fun,

~Karen

Friday, February 25, 2011

Friends on Friday...

I haven't shared a Friends on Friday post in a long time. I think I am going to bring this back as a regular weekly feature. If you've made something with one of my tutorials from a Tool Time Tuesday, or any post for that matter...send me a picture of your version and I'd love to feature you on Fridays.

Remember my jumbo button wall art post I made with the cheese board? Well, just look at the button Sydney made. She went right out to her local Good Will store and found the cheese tray for 50 cents. Look how adorable the button is with 2 holes...too cute and I love the color.

Sydneykatt and her friend Quiltpecan share a wonderful blog called Sew How's This? (click blog title for the link) Go over for a visit...great quilt pictures and Good Will finds.


Have a great weekend,
~Karen~

Thursday, February 24, 2011

Colleen's Corner...Make A Quick Kitchen Island

Here's a long story for a kitchen island.

Colleen is my sister and partner in crime helping me with my dad. Many of you know, from past posts, that my dad lives with us. He has his own separate living area just down the hallway in our home, including his own kitchen. He is 86 years old and he is dangerous! LOL !! You know floods, fire, and uses more electricity and heat to power New York City.

For obvious reasons, he can't be left alone for long periods of time. When hubby and I took the girls to Disney World over Christmas vacation, I had to arrange for someone to stay with him every minute. Two of my brothers and my nephew would come from out of state to be with him for the beginning of the week and my sister would have the last 2 days. However, mother nature kicked in and a whopping blizzard hit New England. My sister was with him the whole week all by herself...a few days at her house and the rest at mine.

Needless to say, she tried to keep busy at my house to avoid going stir crazy. She rearranged my refrigerator, played in my sewing room, cleaned dad's house, hung out with our cat Hallie upstairs for some quiet time...dad talks non stop about absolutely anything LOL!

and she built this island for my dad's kitchen.


Digging through old furniture in our basement, she found 2 side tables that are the same size and our old square coffee table.


One cabinet has doors with storage on shelves and the other has drawers.


She placed the 2 storage units back to back.


and then placed the square coffee table on top. The legs of the coffee table just unscrew to remove.


She didn't have to secure the table on top because there isn't much over hang on the sides, but you could always add "L" brackets to secure it.


There is the seam of the 2 cabinets, but it looks fine. If you were doing this for yourself, you could always cover it with bead board or wains coating to hide the seam.


What a great island...I'm sure with all that snow piling up outside, she was wishing she was on an island far, far away!


Can't thank my sister enough for all she did that week! I owe her BIG time.
space
~Karen~

Wednesday, February 23, 2011

Another New England Friend is Having A Give Away...

Hi everyone, I wanted to share another wonderful give away from a blogging friend. Gail is from the blog, The Fairy Gardener Quilts Too. Her blog is not only full of quilty inspiration, but it is chock full of gardening tips. This is the area I need the most help in. My thumb is definitely NOT green. LOL!!

Speaking of green...look at the beautiful greens in these fabrics. Her give away is 6 (yes, 6) half yard cuts of the fabrics below. That's 3 total yards...WOW!

Click HERE to go to her blog and enter this give away. Click her Follow button too...her gardening tips are wonderful and spring is coming...I hope! There's hope here in New England. I'm starting to see parts of the grass.

Have a great day,
~Karen~


Monday, February 21, 2011

Tool Time Tuesday...Organize Your Scrap Notes

I keep a little note pad on my desk, right next to my computer. When ever I have a thought or an idea, or a "To Do" like a favorite blog to visit, shopping list or an important note...I jot it down on the note pad. However, those little papers are usually scattered all around my computer.

So here's my solution. I found this wooden corner rosette moulding at Home Depot for $1.47. Click here for the link to Home Depot (I have no affiliation to Home Depot, just passing along the item number)


You will need a long, thicker nail or spike and a drill bit that is about the same size as your nail...maybe a little smaller.


My nail is 4 inches long and about 3/8" wide.


Drill the hole directly in the center. I didn't drill this on my desk...just took the picture here for better light. I learned my lesson from stamping that "S" on my desk!!


Drill straight through.


Now the bottom of the hole that you just drilled needs to accommodate the head of the nail. I just used the drill at an angle to drill it out, but there is a drill bit that will make that space for you or your hubby can do it for you too.


Insert the nail so the pointy part is facing up. That nail isn't as sharp as it looks and I don't have small children around, so take that into consideration when making one for yourself.


See how the nail head is flush with the bottom of the wood block. That way it lays flat on the desk.


I covered it with a layer of hot glue to not only keep it in place, but make it smooth so it won't scratch my desk. You can also cover the bottom with felt.


Now just take all your "To Do's" and spike them on the nail.


Just make sure you don't spike the words!


Now all the notes are in one place. I can remove and flip through at any time, but they're still nice and neat on my desk...and cute too!


This desk is usually scattered with little notes...now it's not so bad.


Have a great Tuesday and don't forget to link up your projects at my Sew Darn Crafty Linking Party.
space
~Karen~

Sunday, February 20, 2011

"S" Is For...Sew Darn Crafty Linking Party #3

Hello every one. I hope you had a wonderful weekend. Thought I would share a few "S's" with you for the next linking party.

"S" is for Sunday...the girls are home from college for the long weekend. We had a big turkey and ham dinner with their room mates and friends. Love it when they're home!

"S" is for stamping on metal...remember this project?


"S" is for stamping on paper...remember this project?


"S" is also for stamping on my desk...by mistake! Maybe "S" is for...So not Smart!! Just wanted to "S"hare this picture with you. It's on my desk to the left of my keyboard. Just a little reminder that when things go wrong, it's ok! You just have to laugh.


"S" is also for Sew Darn Crafty Linking Party. Here is where you can link up any project you are working on or have finished. It's a great place to show us what you've been doing and bring new friends to your blog.


Easy steps to join...
  1. Just link up to your project post...not your whole blog. To find the linking address to the specific post (http) just click on the post's title and then Copy and Paste the address in.
  2. project name
  3. your email address...it's not public. Only if I need to contact you
  4. choose a picture

Link up as many projects as you'd like. Linking will end Saturday night!

Let's see what you've been up to!

~Karen~


Wisata Danau Toba - Sumatera Utara

Danau Toba adalah salah satu destinasi wisata alam terbesar di Indonesia dan terletak di Sumatera Utara. Ini adalah danau vulkanik terbesar ...