Friday, May 20, 2011

How To A Mail Package For A Fabric Swap...

Here's a quick picture tutorial on how to mail your packages for a fabric swap.

Your package must include...
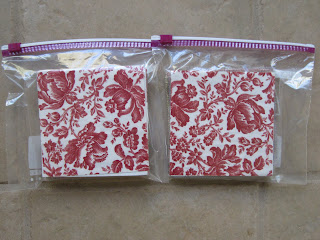
  • the fabric squares in a plastic baggy. Protects them if envelope gets wet in mailing.
  • 2 envelopes...one address to the host of the swap (Karen at Sew Many Ways) and another envelope addressed to the swapper.
  • the envelope addressed back to the swapper must have appropriate amount of stamps on it to get it mailed back to you or include the money for Sew Many Ways to mail it back to swapper.


Fabric in Zip Lock Bags.


I strongly suggest FLAT RATE PRIORITY ENVELOPES.
  • I live in Rhode Island and most swappers seem to be from the mid west or the west.
  • this is the fast shipping 2-3 days
  • and weight or destination are not a factor in flat rate envelopes
  • envelope must say FLAT RATE
  • flat rate is $4.95


The second envelope is addressed back to the swapper.


This is IMPORTANT. You can either send me the $4.95 and I will put the postage on when I mail it back to you...or


The only other option is to put a $4.95 cent stamp on there or a combo of stamps that equal $4.95. They do have $4.95 stamps...I called the post office.

You can not put a METERED MAIL sticker on the envelope going back to the swapper, because it will have your state and a date on it. I will be mailing it from my state.


In the envelope addressed to Sew Many Ways, you will place your fabric, the folded envelope addressed to the swapper and the money if needed.


If you would rather mail it First Class, make sure the correct amount is on the second envelope and the post office weighs it for you. They will factor in that the package has a thickness of more than a 1/4 inch...that's extra.

This is for all swappers in the United States. ALL INTERNATIONAL swappers will get a separate email from me with the shipping cost back to your country. Remember...the easiest way for me to pay for international shipping is for international swappers to pay me through PAYPAL...unless you have access to US funds.

Hope this helps,
~Karen~

There's More Than One Way To Skin A Cat...Uh, I Mean A Quilt

I did a post Thursday about how to rotary cut quilt squares. From some of the comments that were left and emails that were sent to me personally...I just wanted to clear up a few things, especially about the grain of the fabric.

This is how I cut my squares. I took one quilting class 15 years ago. I was the only person who signed up for the class, so I had a lot of one on one time with the quilt instructor. This is how she taught me. Is there another way to cut fabric squares or strips...you betcha!!! I'm sure there are Sew Many Ways to cut fabric! (sorry, couldn't resist) There are probably more ways than we can think of. However, at the end of the day, our fabric is cut, sewed together and we all have a beautiful quilt to keep or give away.

I quilt for my family or for gifts...mostly baby gifts. The people who receive my quilts have no clue what the grain of the fabric is. All they see is something made from the heart and I hope something beautiful.

Is the grain of fabric important? Maybe to some, but not me. I always cut yardage the way I showed in the tutorial, which is pretty close to cutting on the grain...I know not precise, but that's ok for me. I will probably never enter a quilt in a quilt show...never have enough confidence for that! I love scrap quilts and using up bits and pieces. Do I have the time to figure out the "exact" grain of the fabric on a piece of scrap material? Nope. I just want to sew and get that top finished.

My mind goes back to the past and how women would cut up feed sacks to make those gorgeous 1930's quilts or how they cut up worn out clothing to make the best scrap quilts ever. Were they thinking about the grain of the fabric? I think I was born in the wrong time period.

My thoughts also go to Bonnie Hunter from Quiltville.com who is the scrap quilt queen in my eyes. She uses everything from shirts she finds in thrift stores to scraps that are sent to her from other quilters. I just love her scrap quilts! She is such an inspiration.

When it comes down to it, among the millions of quilters in this big world...professional to newbie...we are innately the same. Our destination in life is to create, sew and make something that speaks to the heart. We all just take a different path to get there.

Hope you have a wonderful day and can sneak some sewing time in there too,
~Karen~

Wednesday, May 18, 2011

How to Cut Fabric Squares with a Rotary Cutter...

Thought I would do a post on how to cut fabric squares with a rotary cutter and cutting mat.

Cotton fabric is usually 42"-45" inches wide. When you are ready to cut your fabric, fold it in half and match the edges of the selvedge. You would hold the fabric up to match the edges, but I pinned mine to the ironing board to take the picture.

See how flat the fabric is?


If your fabric has a little bow to it or a swag to one side, like in the picture below, that causes your fabric strips to have that wonky center. Just slide your fingers until the fabric straightens up.


Fold the fabric in half again...making sure you don't have that same swag in the fabric like below.


Once the fabric is folded and flat...iron the folds.


Now place on your cutting mat...


Line up the bottom, folded edge with a horizontal line on the mat.


Make sure the raw cut edges of the left side are past a line on the mat.


Make sure all four layers are past the line.


Top layers too.


To square up the edge, place your ruler on the line of the cutting mat.


Line up the ruler on the line of the mat below the fold.


and the top too.


Sometimes if there is enough fabric, I will match a horizontal line on the ruler with the line of the fabric too.


Hold your ruler in place and cut with your rotary cutter.


Peel away raw edges.


Keep fabric in place.


To cut the squares, place your quilt ruler at the fabric. I will be cutting 5 inch squares.


Match the vertical line on the clean cut edge of your first cut.


See the fabric in between the black lines...lined up with the black 5 inch line.


To keep the fabric square, line up the bottom line of the ruler with the folded edge of the fabric.


The fold is between the horizontal lines.


Hold your ruler in place and cut with rotary cutter. (My left hand would be holding the ruler, but I'm taking the picture)


Now you have one 5 inch strip of the folded fabric.


Take that 5 inch strip and turn it horizontal. Make sure both the raw edges and the folded edge are past a line on the mat. To make the most of your fabric, you can get 2 sets of 5 inch squares out of this strip, so you need 10 inches of fabric plus the little extra over the lines


Small amount of fabric past the line on the left...


Make sure all edges are over the line.


The folded edge is past the line on the left.


Now take your ruler and line it up with the line on the mat, just like your first cut that you made.


Cut the raw edge away.


To make the first set of 5 inch squares, take the ruler and line up the vertical line of the ruler and the horizontal line on the 5 inch mark. See my 2 fingers?


Cut with rotary cutter.


Tah Dah...but we're not done yet.


Slide the ruler over and cut your second set.


and trim off that little extra fabric of the folded edge.


Now you are officially done....8 squares at 5 inches each.                               


If you are careful with your folding and raw edges, you can get 8 five inch squares out of each strip of fabric. Make sure every once in a while, as you are cutting down the length of your folded fabric, that your square it up with a clean edge again

One yard of fabric should yield 56 five inch squares.

Hope this helps,
~Karen~

Red and White Fabric Swap Detail Info...

The following information is for participants of the Red and White fabric Swap. This swap is closed to any new additions.

Please read all info to the end of the post!

Here are the details for the swap...We have a lot of first time swappers, so I'll be very detailed
  • 125 swappers
  • 5 inch squares
  • you need to cut 125...5 inch squares. This is about 2 1/2 yards of fabric.
  • I have a post coming up on how to cut the squares if any one needs a little help
  • red and white fabric only...if at all possible just red and white
  • 100% cotton
  • quilt shop quality...you can tell the quality of the fabric by the feel
  • any print, pattern or design in the fabric
  • can cut from all of the same fabric or if you are cutting from your stash, different fabrics are fine too. Just need 125 red and white 5 inch squares
  • you will mail all blocks to me with another envelope addressed back to you with postage on the envelope. I will do a separate post about mailing, packaging and postage.
  • once I receive all the squares, I divide them all up and then mail them back to you
  • you will then have 125 different red and white fabric squares to make a beautiful quilt!!
  • DEADLINE to mail them to me is JUNE 15th...lots of international swappers, so they need shipping time
Here are a few examples of some red and white fabric that I had in my stash.


Selvedge Issues...
  • If there is a selvedge edge on your fabric that is not in the same print, please remove before cutting your squares. Not fun to receive some blocks with the white edge outside your seam allowance.
  • my thought was to have everyone add the cut strip of selvedge in the envelope and then I will have a drawing among all the swappers for one lucky winner to receive all the selvedges
  • what do you think??


Here are a few close ups of some of the designs or patterns in my red and white fabrics.


Look for posts on cutting and shipping coming up. All posts pertaining to this swap can be accessed by clicking the Swap Button at the top of my side bar.

I would greatly appreciate all swappers from all countries outside the US to email me with the name of their country, so I can determine postage for you!! Thanks so much.

If you have any questions, please feel free to email me...sewmanyways@ gmail.com

Take care,
~Karen~

Wisata Danau Toba - Sumatera Utara

Danau Toba adalah salah satu destinasi wisata alam terbesar di Indonesia dan terletak di Sumatera Utara. Ini adalah danau vulkanik terbesar ...