Saturday, May 28, 2011

Blog Buddy...How to Link on Your Blog Post


Blog Buddy is your friendly little helper in the blogging world. Sew Many Way's Blog Buddy posts have helpful hints and tips to make blogging fun and easy. Just things I picked up along the way or learned from mistakes I made myself.

Today I will be showing you how to link to something in your post. It may be another blog that you want to give credit to or an online fabric store that you just love and want to share or you may want to link back to one of your own posts from the past.

Linking is quick and easy once you know the steps.

I made these pictures large so you can see the details, but you can click on them to enlarge.

The first step is to go to the blog post or the site that you want to link to. If you want to link just to some one's blog, then just click on their blog name or the Home button. If you want to link to a specific post you must click on the Post Title to get to the correct http address.
  • go to the site
  • at the top of the screen is the http address
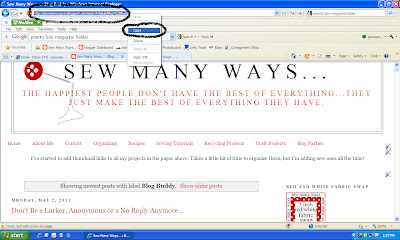
  • put your cursor on the address and right click it. It will high light, then a drop down menu will pop up...click on COPY. 


Now go to your post that you are writing...
  • Pick the word or words that you want the link to be. I picked Blog Buddy.
  • place cursor over the word, left click on drag to high light. (circled in black below)


After it's been high lighted, go to the word at the top of your post that says LINK (circled in black below) and click that word.


Another screen will pop up that looks like this or something similar.


Place your cursor in the long empty box that says "to what url should this link go to?" Right click in that box and a drop down menu will appear. Click on PASTE...that will be the address that you COPIED before.

One IMPORTANT note...depending on what version you are using for writing a post...if the place where the address goes already has the letters "http" in the box, you must delete that first before you paste, because your paste already has the http in it.


Once the address is in the box...click on "OK" (circled in black below).


Now this picture is what it will look like after it is linked. It will appear in blue. Me being picky...blue doesn't match my blog! LOL


So high light the word again...


Click the letter "A" with the colored bar underneath and a drop down color menu will appear. I picked red...what else right!


and here is the word Blog Buddy...linked back to all my Blog Buddy posts and in red ink.


It seems like a lot of pictures to describe a simple step, but once you do it, it's easy as pie!!

Happy Blogging,
~Karen~

Thursday, May 26, 2011

Thoughts on Thursday...

Did you ever have one of those "To Do" List days? So many things to do and so many places to go. One day I was in the drive thru at the bank reading my list and when I was done, mind ticking away, I drove away with the bank tube container. I just took the tube and drove away! Who does that?

I still laugh about it...I had to drive all the way around the bank and wait in line again to return it. You only do that once in a life time.

Have a great day,
~Karen~

Monday, May 23, 2011

Tool Time Tuesday...Drop Cloth Purse

This week's Tool Time is definitely from the hardware store...in the paint section actually. We're using drop cloths today. They come in so many different sizes and different types of canvas and oh yeah...they're cheap. Some canvases in the fabric stores can be $10.00-$15.00 yer yard, if not more.

You can use drop cloth fabric for so many things...curtain panels, bags, outdoor furniture slip covers, pillows, tablecloth etc.

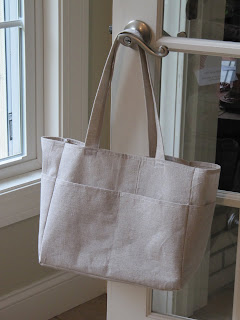
We'll be making this cute little tote bag today. Totally winging this pattern, so no specific measurements, just the concept.


This package is 5 feet by 5 feet and was only $5.00. Even if I paid $12.00 a yard at a fabric store this package would cost $19.00.

The package says...finished hems and leak proof backing. Not all drop cloths have leak proof backing, but the plastic backing is great for purses or diaper bags.


I love the look of this fabric. It's almost a light gray linen look.


Here is the plastic lining. I ironed as I went along with this project on the fabric side and nothing happened to the plastic, but test yours first.


This is how big the piece is.


Here's the tutorial for the tote bag. I started with one piece 12 1/2" by 42"  and another 8 1/2" by 42". These are just made up measurement for the size purse I need. Try any size you'd like.

The large one is the body and the small one is the outer pocket piece.


Make sure you cut your 2 pieces using the already hemmed edge. These hemmed edges will be the tops of your tote bag. One step already done for you!

Place the pocket piece on top of the body piece with hems towards the top, both pieces are right side UP.


Run a 1/4 inch stay stitch on the bottom just to hold the 2 pieces together.


Fold over the long piece to join the short edges.


Pin the short side...


and sew with 1/2 inch seam. You can zig zag over this to prevent fraying and add a finished edge.


Now measure over to form the width of the sides of the tote. Pin, BUT only pin through one body piece and one pocket piece.


Take the pinned portion and fold over until pins are on the fold...


Now sew about 1/8 inch from the fold. This is just to form the corners of the tote.


Here is the 1/2 inch seam that connected the 2 raw edges on the right and the other narrow seam on the left.


One side done!


Now to find the opposite side, place the sewn side down...see it underneath in the middle?


Now measure from the right side and...


the left side to make sure there is the same amount of fabric on each side.


Pin down the length of the fabric for both seams


Fold over and sew close to the pins again like the first side seam.


Here's a close up.


Both sides are formed.


Now turn right side out and sew the seams for the pockets that you want. On one of my long sides of the tote, I sewed 2 pockets.


and the other long side I sew 3 pockets.


Now for the bottom. Just measure the width and length and add 1 inch. I used 1/2 inch seam allowance, so that's the extra 1 inch.


Cut out your bottom piece of fabric.


Sew with 1/2 inch seam allowance. I stopped at each corner to leave a 1/2 inch and back stitched a few times and started over. I didn't pivot.


For the bottom support of the purse...here is one more use for those plastic place mats I bought in the clearance rack at Target.


Measure the inside to cover the seams.


Cut out your place mat and in it goes. You can make a little pouch for it with the canvas to cover up the plastic.


Make 2 handles and you are done! Looks a little plain though. So how about a...


pretty little flower! Perfect for summer.


Look how much canvas I have left over. I think I see more projects in the future.


Head over to the paint sections of your hardware store for some fabric, but remember it's our little secret or they will raise the prices.

Happy Tuesday,
~Karen~

Do You Have A Dream?...

I don't mean the dreams we have when we are sleeping, but a dream to do something...a hope, a some day. There are little dreams and big dreams.

My little dreams would be to finish a certain quilt, finish cleaning out the attic, get rid of things I really don't use.

My bigger dreams are to pay off the mortgage, pay off college bills (that's not happening any time soon, both girls are still in college, but I can dream!!)

My biggest dream...to own a quilt shop. This is soooo just a dream, because I still have to work my regular job as a dental hygienist to pay the bills....you know that pesky mortgage and the college bills. Oh yeah, food we need food too...LOL!

Ok, back to the dream. This won't be just any quilt shop. I want it to be a destination quilt shop. I want it to be in a big remodeled barn or barns...exposed beams, high ceilings, wide barn board floors, bright light from big windows and fabric every where.

I want fabric to be divided into three categories...designer, color and era. If you love just one designer, they will be arranged all in one place. If you are shopping just for reds...all colors will be together. If you are shopping just by civil war or 1930's, they will be there. I would by several bolts of the same fabric just to have it in each category. This is a dream remember...stay with me here!!

Attached to the store barn is the class room/retreat barn. Same look, but great big beautiful old farm tables every where with sewing machines, ironing boards and cutting tables for each person. A big old fashion soda fountain bar for snacks, yummy drinks, tea and coffee. Big comfy leather couches for reading thousand of quilt books and magazines.

Now on to the farm house next to the 2 barns...a big remodeled farm house turned retreat house. A big old farm kitchen...I won't get into the details, my head is spinning. I love kitchens. The rest of the farm house will be turned into individual single rooms for each quilter at the retreat. Each quilter will have her own bedroom, bathroom and little sitting area. I know...this is going to be a big farm house...again, a dream.

If you are making it just a day trip to the quilt shop and your hubby is coming along, another barn will have a lounge and virtual sports games like golf, baseball etc for them to play. Large screen TVs every where with all kinds of sporting games on.

My husband and I would love to work together some day and this seems to be the perfect way to go. However, I think we are missing about $500,000.00 give or take.

That's my dream in a nut shell...from a nut case!

Do you have a dream?

Remember...Walt Disney said...All our dreams can come true, if we have the courage to pursue them.

Have a great day,
~Karen~

Sunday, May 22, 2011

Sew Darn Crafty Party...Week 15


So sorry I'm late getting the party started!! Better late than never. I can't thank you enough for joining in this linking party every week and for sharing all your fabulous projects. This party would be absolutely nothing without you!!.

So let's see what you have all been up to this week...

Sew Darn Crafty is all about YOU!! Show off your projects, share a tutorial, show us your vacation pictures, share a family favorite recipe...share anything. Not only does linking inspire us all, it also brings lots of new people to your blog for a visit. Click here for past parties and lots of inspiration

Easy steps to join in on the fun...

  • link up to the specific project post, not your whole blog. Makes it easier to link right to that post and not  search through all your whole blog. To find the http address to a specific post, just click on the Title of your post.
  • link as many projects as you'd like...old or new
  • anything goes...cooking, sewing, knitting, crafts, organizing, remodeling projects etc...
  • visit other links to share some blogging love! You know we all love comments!
  • grab a Sew Darn Crafty button for your blog (on my right side bar) or just link to the party in your post.
  • the more we share, the more people will join and then there's more inspiration to look at!
  • linking is open til Saturday night, so plenty of time to join in
  • just click the "click here to enter" button and follow the easy steps

Have fun linking up! Don't forget to come back and take a look at all the great projects during the week,
~Karen~

Wisata Danau Toba - Sumatera Utara

Danau Toba adalah salah satu destinasi wisata alam terbesar di Indonesia dan terletak di Sumatera Utara. Ini adalah danau vulkanik terbesar ...