Friday, March 18, 2011

Friends on Friday...Lots of Inspiration

I love when friends share their project pictures with me. Whether it be a picture of a project they've tried from one of my posts or a wonderful project of their own...Friends on Friday is where I like to share them.

If you have a project you'd like to send me, I'll share it on Fridays. Just to make the process a little easier...if you send me a picture to share on my blog, that automatically gives me permission to use the picture on my blog, with a link back to you and your blog of course. The automatic permission just eliminates emailing back and forth for permission. Thanks so much for understanding!

Now onto some great projects and a pattern request at the end.

The first idea comes from Lissa from the blog Northern Nest. Click Here to go to her post. She saves the bags that onions come in and uses them for the best idea EVER...


She makes pot scrubbers with them. I am so mad at myself for throwing all those bags away. Thanks Lissa for sharing this great project. Definitely on my "To Do" list!


Next project is from Cindy at Bumblebee and Sophie. Click Here for the link to this project. Cindy is a girl after my own recycling heart...and Mod Podge too. Love it!


Aren't these the cutest darn containers ever!


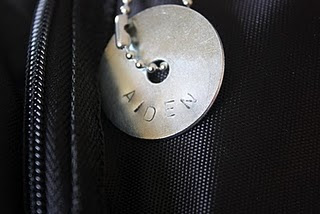
Next is Jen's project. Jen's wonderful blog is Chase-ing The Dream and you can click Here to go to this post. Jen used my metal stamping post, but she went one step further and used the washers for the best idea. She put them on her boys' soccer bags to tell them apart and they make great zipper pulls too! Thanks so much Jen for sharing, I love them on the bags!


This project is from CeLynn from The Sunflower Patch blog...click Here for her post. She used my tutorial for the pvc pipe knitting needle holder, but boy are hers cute. She covered them in fabric and used my favorite thing...Mod Podge! These are adorable! Thanks CeLynn.


Now for a pattern request.

These 2 pictures were sent to me from Karla. She doesn't have a blog, so I thought I would post these picture here for her.
s
These pictures are of her "joy bottle" Easter Bunny Lady. Karla's grandmother made this little cutie for her daughter 34 years ago. Each morning the children could pick an egg out of the bottom of the skirt and have the treat inside!
s
Karla was wondering if I have ever seen this pattern or knew where to get one.
If anyone has any info on the Bunny pattern, you can either email me directly or leave a comment on this post.


Thanks to all the wonderful ladies who shared their projects today! Go over and visit their blogs for more great ideas.
space
Can't wait to see more of your pictures and projects,
space
~Karen~

Wednesday, March 16, 2011

My Thoughts on Thursday...

Have you ever driven up to the speaker of the drive thru menu board to order and then realize you are talking to the trash can?

You only do that once!! LOL

~Karen~

Blog Buddy...Adding Labels to Posts and Side Bar

Hello, Hello...hope you are all doing fine. I haven't done a Blog Buddy post in a while, so today I thought I would pick the topic of Labels.

What are Labels you ask? Maybe you didn't ask, but I'll tell you any way! Labels are categories where each of your posts can be listed so visitors to your blog can find a particular post fast and easy.

Labels are VERY important to a blog. Here's a scenario.
  • you did a post on say...a tutorial for sewing a purse or making a yummy chocolate cake
  • a visitor of your blog saw that post a while ago, knows it's on your blog, but not sure WHEN you posted it
  • a visitor to your blog doesn't have the time to search through every single one of your posts to find that tutorial or recipe.
  • where do they go? Well, to your LABELS section on your side bar
  • they just click on a category, such as sewing tutorials or recipes, and poof there are all your posts that you Labeled SEWING TUTORIALS or RECIPES!!
  • yay!! super fast.

Ok, here's the low down on LABELS...Click on each picture to enlarge to see the details and then click on it again to enlarge more

This first picture is of what the LABELS section looks like on the right side bar of my blog.


The black circled section is what it looks like under each of your posts. It tells which label you've chosen for a post.


Here is how you add LABELS to your blog...

Go to your Dashboard of your blog and click on DESIGN (circled in black)


This brings you to the ADD and ARRANGE PAGE ELEMENTS. Click on the ADD GADGET button (circled in black) on the right side bar.


This screen pops up. Scroll down until you find LABELS (circled in black). Click on the name or the PLUS sign to add it.


The Configure Labels window pops up. Choose how you want it designed and click SAVE. When it's added to your blog, the Labels will be on the top of the side bar. Just click and drag your new Labels section up or down to where you want it. Click SAVE again.


Now here are the steps for labeling your posts...you can do this when writing a new post or go back in and edit an old post to add a Label. When editing a post, go to the edit page, change what you need to on a post and click Publish again. It won't publish again on the day you are editing, it just makes the change and keeps it on the original date you published it.


Here is a sample of a post in progress. When you're done writing, go down to the bottom box (circled in black) and type in your label name or category. When you start typing, the labels that start with the same name will pop for you to choose from.


Or there is a button on the right side of the box that you type in that says SHOW ALL (circled in black)


Click on that and all the labels that you have ever used in the past will pop up. Just click on the one you want to use and it will show up in that box.
space
Once you decide on a label and your post is published, that particular post will end up under that category in the LABELS section on your side bar.


For a quick edit of your labels, you can be on your main blog page and scroll down and see little Tools next to each gadget you have. Only you can see these icons on your blog page.
Click on the tools and that Configure window pops up. You can change the way your lists are shown on your blog...


The choices are LIST style (one label after another) shown below....


or CLOUD style, which is all the labels shown together and the font size changes on its own by how many posts are in the particular label. I chose to have my labels in a cloud style with the number of post in each category after the name.


If you ever want to remove a label from your list, you need to go to the edit page of all the posts that have that Label and remove the label name from that little space under each post.
space
I hope this helps. If you have any questions, please feel to email me. I don't know every thing, but I'll try to help. CLICK HERE for more Blog Buddy posts
space
Take care,
~Karen~

Monday, March 14, 2011

Tool Time Tuesday...Bird Nest Material

Happy Tuesday everyone! Today's Tool Time encompasses many things...hardware store finds, scrap fabric, thread, yarn, batting, dog hair (yes, I said dog hair), recycling, nature and helping little birdies. Wow, that's a lot in one post, but this is an easy one.

This is a mesh "purse" I made for all the birds who are starting to chirp away now that spring is just around the corner. All the goodies in the mesh purse are there to help the birds build their nests. There are many sites out there that will explain the items birds need to build their nest, but I found one link that was helpful. Click here for the link. Scroll down on that page until you reach the Nest Material section.


Here are the items you'll need...
  • wire mesh or chicken wire...found in hardware store or in my father-in-law's garage!
  • 2 pieces of thin wire to "sew" the edges closed
  • wire cutters
  • and all your scrap sewing items...thread, yarn, fabric strips, batting
  • I also added our dog Annie's hair (which they recommend). It all came out of the dryer vent after I washed her cotton blanket. I know dryer lint is not recommended, but this is seriously just all her hair because that's all I washed. Dye free detergent and no dryer sheets were used

The edges of the wire mesh had sharp points...


just snip those off with your wire cutters.


Now they're nice and smooth. Sand if necessary.


You can make your scrap bag in any shape, so the starting measurements can be any thing. This is just a rectangle piece that I had.


First, I folded up the bottom to form the purse.


Next, fold over the top flap, like an envelope.


This is the thin wire I used to "sew" up the side seams.


Start at the bottom corner.


Twist the wire to attach it to the mesh.


Just weave the wire in and out through the mesh and pull tight as you go along.


Here is the whole side sewn up. Repeat on the other side as well to form the "purse".


This is the view from the top with the flap open, looking in with both sides sewn up.


I looked through all my old buttons for a closure.


Wire the button to the front.


and add a ribbon to wrap around the button to keep the pouch closed.


Now fill it up with all your sewing scraps!


Twist the ribbon around the button.


Add another ribbon to hang the pouch from the tree.


I also added a stick and cotton batting which I forget in the original list of materials needed.


I poked the stick through the mesh. It's the perfect perch for the birds to rest on while they are taking out the materials they need to build their nest.


Now it's all set to hang outside for our feathered friends.


Don't forget to add all your beautiful cotton quilting scraps. With all that fabric, you'll have the prettiest bird's nest around!


This area of our yard is always full of bird's nest, so I hope these little bird purses filled with their building materials will help.


The temperature is in the 20's tonight! This post is one more way to...
space
Think Spring, Think Spring, Think Spring!!
space
Dont' forget to join the Sew Darn Crafty Link Party...show off YOUR projects and there's a give away too. Click here to join in on the fun!
space
Have a wonderful Tuesday,
~Karen~

Quilting Ruler That is Heaven Sent...

Ok, I didn't think I lived under a rock, but maybe I do or this ruler is brand new. I'm thinking the rock theory, but that's just me!

I look at quilting rulers every single time I go into a sewing/quilting store...every time! I have a 6 inch wide by 24 inches long quilt ruler. Why it's only 6 inches wide and not 6 1/2 inches when most quilters cut strips or blocks with the extra 1/2 inch seam allowance is beyond me.

Well, look at this...Ahhhhh!!! Can you hear the angels singing?!!


See that measurement on the label...6.5" x 24.5"? Yay!


I hope you can see the color change on this ruler. See that pinkish colored edge on the top and the right? Well, that's the extra 1/2 inch.


The ruler can be flipped over so you can use any of the measurements. The main black lines can be either 1 inch or 1 and 1/2" inch.
space
So, if you are cutting 2 and 1/2 inch strips, you would line up the edge of your fabric on the 2 1/2" darker cutting line. Easier for me to see the darker line than the lighter line in between.


On the other side, it's still the regular 1", 2", 3" on the darker lines.


The markings are on the long side and the short side too, so you can hold the ruler in any direction. I just love the fact that I can cut a 6 and 1/2 inch block with this ruler!


I used a gift card I had at Walmart to buy this. It was in the craft department for $12.97.
space
Don't forget my Linking Party...Sew Darn Crafty. There's a little give away with it this week too.
space
Click HERE to go to that post to join in on the fun and see all the wonderful projects.
space
Have a great Monday
~Karen~

Wisata Danau Toba - Sumatera Utara

Danau Toba adalah salah satu destinasi wisata alam terbesar di Indonesia dan terletak di Sumatera Utara. Ini adalah danau vulkanik terbesar ...