Here is the Santa Claus tree...click here for the original post on that
To start, I placed the hole tree in the storage container I keep all the supplies in.
The tree stem was too tall and bare looking for me, so hiding it in the container helps.
The tree stand fits perfectly.
Then I just wrapped the base with a piece of quilt batting to look like snow. You could use a white blanket or throw too.
Now here's the process of decorating...lights first. This is a pre-lit tree, but 6 of my other trees are un-lit.
Here are a few light tips...
- start at the top
- wrap the lights from the inside out to give the tree a little depth
- I use five to six 100 light sets on a 6 foot tree
After lights comes the garlands or beads. I use three different garlands...red wooden beads, red berry garland and the peppermint candy garland I made. Click here for the peppermint candy tutorial.
I go by the 3 to 1 rule...I made this up, but it helps me when I'm buying clearance items and need to know how many I should buy.
- 3 feet of garland for every foot of tree
The berries I found in the floral section on clearance during the year. Adds dimension to the tree when they stick out from the branches.
Just layer the garlands between each other with a little draping.
See how the berries stick out.
Next comes all the ornaments.
Add different sizes and textures...about 40 balls Click here for Santa ornament tutorial
10 candy canes
20 longer plastic candy canes to add length...bought these a long time ago at Walmart. Love plastic!!
These word ornaments are great too. I use them for fillers after the balls go on for color in the bare spots. A box of them was about $2.00 regular price.
Here's where I start...at the top!
- Balls on first. For some reason I always start at the top right and then zig zag my way down, right to left...right to left.
- think triangles as you placing them...see the 3 red balls, they form a triangle
then use your other ornaments to fill in between.
Then I wanted even more fillers, but free ones!! I covered Styrofoam balls with cotton batting to make "snowballs"
Use them to fill in bare spots
Zig zag your way around with these too
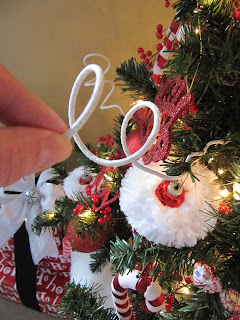
Now for more dimension. I found these in the Christmas section of Walmart (where else) but floral sections at the craft store is a great place for things like this too. Don't always think Christmas.
Start at the top and do your "zig zag" thing. Put a few on and stand back...look to see where the next zig is going to be.
These are wires, so they just wrap on the branch very easily.
Now the topper...this can be anything related to your tree. I used a Santa hat and those large over sized candy canes that are yard ornaments.
You might have to wire bigger items on at the top.
Add a few fake wrapped presents for decoration at the bottom and you're done.
Here are some quick tips when packing it all away...remember this is the box from the bottom decoration.
I place all the balls on the bottom...they are shatter proof plastic
cover with a layer of recycled bubble wrap.
Bag up small items
Paper towel tube for garland
Liquor box divider for ornaments
All safe and sound...
You can get these liquor box dividers for free.
layer with soft things for protection
The berries are a pain in the hooty...they keep getting tangled. Layer each section with garbage bags.
When you pack your tree away, it NEVER fits in that rinky dink box again. I use a bungee cord to keep it together.
All set for another year...Now where is that cover?!?
Hope this helps a little. Maybe you can use a few of the tips when Christmas rolls around this year. This post will be in the archives, so when you need it in December, it will be here.
Take care,
~Karen~


