This is a story that might only be funny to a certain age group, but still funny none the less. If you are old enough to remember sanitary napkins that came with a belt and those waxed paper bags to throw them away in...you are my target group. All others will still enjoy! I know sanitary napkins??? Bear with me...it's a good one.
space
Here is a little background for the story. I am the youngest of 5 children, my father career military retiring in 1970, my mother the perfect base commander's wife and military hostess extraordinaire. Always hosting the perfect party even after they were out of the military.
space
Enter me...1973 or so, 8 or nine years old. My mom and dad were having a very big party. You know the fancy ones...china, crystal, silver and in the DINING ROOM. The table was mostly set and the guests were ready to arrive soon, but I wanted to help. What was the safest job my mom could give me..."Oh Karen, how about you put the cloth napkins on each plate".
space
Ooohhh!!! I was so excited to decorate each plate with a napkin. But wait...I remembered something my mom told me one time in the bathroom, "Oh honey, put those little bags back in the box, those are just for napkins"
space
Those pretty waxed blue bags are just for napkins. How perfect...and mom said they WERE for napkins. So up to the bathroom I went, gathered up a handful of the plain blue waxed bags from under the sink.
space
I carefully folded each napkin and placed it in it's very own special bag and then placed one on each plate. I think I still remember how excited I was when I finished.
space
I will end the story here with you just picturing the look on my mom's face when I called her in the dining room!!!
space
I think I was trying to be Martha, before Martha was even Martha and I just have to say...that was probably my very first Tool Time Tuesday!
space
I think I just made my mom laugh in heaven,
~Karen~
Thursday, July 15, 2010
Wednesday, July 14, 2010
I Saw A Mouse...And It Wasn't Mickey
We had a mouse in our cupboard. I wanted to ring it's little neck. I had 2 bags of chocolate chips...the store brand and the other was Nestle. Which one do you think he ripped opened and filled his stomach with? Actually, he could be one of my kids going for the name brand food over the generic. I, myself, eat anything. Lol
space
It took me the whole day last week to clean out the shelves and bleach everything. Now the only thing in the cupboard are cans and canning jars. No bags of any food for him to bite into.
space
I used these caps for canning jars instead of the 2 part lids.

The one piece caps are easier to work with on a daily basis, rather than the disk and ring combo that you would use for canning food.

Aren't they cute?

and these yummy new chocolate chips are safe from the mouse. However, this jar was full before I took this picture, so I don't think it's safe from the 6' 3" mouse that I'm married to!!

Hope you don't have a mouse in your house!! I want to know why he's not outside enjoying the summer. Well, now that I think about it, why not stay inside...it's air conditioned and we serve chocolate!!
space
Take care,
~Karen~
Monday, July 12, 2010
Tool Time Tuesday... Handmade Fabric Beads
Happy Tuesday! Happy Tool Time. What's the most common tool we all have? Nails...nails of every size and shape...tall ones, short ones, thin ones and fat ones. Well, go raid the tool box and bring those nails to your craft room, because we're going to make some jewelry.
space
All you need are nails, of course...

some of your favorite fabric...

this fabric has a little sparkle in it. The size of the print or design doesn't matter much, because you will be rolling it up so only some of the design will show.

You will also need some kind of glue. I always use Mod Podge. It works great, it dries fast and it also acts as a sealer. It comes in matte or glossy. The beads you will see here are matte finish.

Below are tutorials for 2 different types of beads.
space
The first bead is one that is the same size and thickness all the way around. The second bead is a tapered one.
space
For the first bead, I just ripped a strip of fabric about 3/4 inch to 1 inch wide by 7 inches long.

Start by placing the wrong side of the fabric under the nail and start rolling.

I pulled the tail of the fabric with my right hand, while I rolled with my left. It kept the fabric taught.

When you come to the end, add a dab of Mod Podge or glue.

Seal the end over. I also rubbed more Mod Podge over the whole bead to seal the fabric. It still feels soft and flexible when it dries.

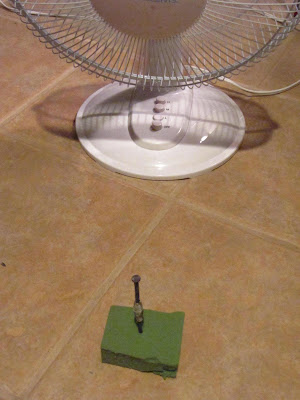
I then used my high tech drying system...Styrofoam and a...

Fan.

When it dries it slides right off, because you only used the glue on the outside not near the nail.

Here it is! Isn't it cute? These picture were taken the next morning so they are a little brighter. If you rip the fabric like I did, you can trim the little fly aways now or leave them for a textured look.

Here is the inside tube that the nail formed. If you have a certain necklace that you want to use, make sure the nail is thick enough to make the hole in the bead fit over the bail of your necklace.

I added a sterling chain...plain and simple.


or you can put it on a leather cording with some extra beads. I just used what I had at home. I think if I started a bead hobby (another hobby) I would have to commit myself.

The next bead is a tapered one. I'm using Christmas fabric in honor of Christmas in July.

This fabric you will have to cut into a long skinny triangle. You can free hand cut scraps or honey bun strips or jelly rolls. Remember the width of the strip is the width of the bead.

I cut mine one inch wide.

This next part I just made up as I went along, but it worked great for me.
I placed my quilt ruler so the right outside edge of the ruler was at the edge of the fabric at the bottom of the strip.

Now, slant the ruler to the left until you reach the length you need. See where my finger is at the top. My strip is 6 inches long. Can you see the triangle shape under the ruler?

Here's a close up. Now I used a rotary cutter and trimmed up the ruler at that slant.

Just open up the fold and now you have a even sided triangle.

Now take your nail and start wrapping the fabric over, but make sure you start from the widest end of the fabric towards the point.

Keep wrapping until you get to the pointy end, making sure to keep things centered as you roll along.

Glue the end as in the previous bead.


and seal the whole bead with Mod Podge.

Stick in your fancy drying system again.

I realized after I cut out that first triangle out of the scrap fabric, that I had left had 2 triangles staring me in the face.

So I cut them apart...

and made 2 smaller matching beads.


Here they are all dried and ready to be worn.


Now here they are the next day in better day light. I shouldn't craft and take pictures at 1 am any more! Made the previous pictures come out yellowy.

Just add your favorite chain and some beads.

So pretty and so simple...made from scraps actually.

Beadutiful...Ok you know I couldn't resist a play on words.

Thanks for always stopping by and don't forget this week's give away for Sharing on Sunday (Christmas in July).
space
All you need are nails, of course...

some of your favorite fabric...

this fabric has a little sparkle in it. The size of the print or design doesn't matter much, because you will be rolling it up so only some of the design will show.

You will also need some kind of glue. I always use Mod Podge. It works great, it dries fast and it also acts as a sealer. It comes in matte or glossy. The beads you will see here are matte finish.

Below are tutorials for 2 different types of beads.
space
The first bead is one that is the same size and thickness all the way around. The second bead is a tapered one.
space
For the first bead, I just ripped a strip of fabric about 3/4 inch to 1 inch wide by 7 inches long.
- The width of the fabric is the width of the bead.
- The length of the fabric is the thickness or how fat the bead is.
space

Start by placing the wrong side of the fabric under the nail and start rolling.

I pulled the tail of the fabric with my right hand, while I rolled with my left. It kept the fabric taught.

When you come to the end, add a dab of Mod Podge or glue.

Seal the end over. I also rubbed more Mod Podge over the whole bead to seal the fabric. It still feels soft and flexible when it dries.

I then used my high tech drying system...Styrofoam and a...

Fan.

When it dries it slides right off, because you only used the glue on the outside not near the nail.

Here it is! Isn't it cute? These picture were taken the next morning so they are a little brighter. If you rip the fabric like I did, you can trim the little fly aways now or leave them for a textured look.

Here is the inside tube that the nail formed. If you have a certain necklace that you want to use, make sure the nail is thick enough to make the hole in the bead fit over the bail of your necklace.

I added a sterling chain...plain and simple.


or you can put it on a leather cording with some extra beads. I just used what I had at home. I think if I started a bead hobby (another hobby) I would have to commit myself.

The next bead is a tapered one. I'm using Christmas fabric in honor of Christmas in July.

This fabric you will have to cut into a long skinny triangle. You can free hand cut scraps or honey bun strips or jelly rolls. Remember the width of the strip is the width of the bead.

I cut mine one inch wide.

This next part I just made up as I went along, but it worked great for me.
space
I folded the strip in half length wise, keeping the fold on the left side.

I placed my quilt ruler so the right outside edge of the ruler was at the edge of the fabric at the bottom of the strip.

Now, slant the ruler to the left until you reach the length you need. See where my finger is at the top. My strip is 6 inches long. Can you see the triangle shape under the ruler?

Here's a close up. Now I used a rotary cutter and trimmed up the ruler at that slant.

Just open up the fold and now you have a even sided triangle.

Now take your nail and start wrapping the fabric over, but make sure you start from the widest end of the fabric towards the point.

Keep wrapping until you get to the pointy end, making sure to keep things centered as you roll along.

Glue the end as in the previous bead.


and seal the whole bead with Mod Podge.

Stick in your fancy drying system again.


I realized after I cut out that first triangle out of the scrap fabric, that I had left had 2 triangles staring me in the face.

So I cut them apart...

and made 2 smaller matching beads.


Here they are all dried and ready to be worn.


Now here they are the next day in better day light. I shouldn't craft and take pictures at 1 am any more! Made the previous pictures come out yellowy.

Just add your favorite chain and some beads.
So pretty and so simple...made from scraps actually.

Beadutiful...Ok you know I couldn't resist a play on words.

Thanks for always stopping by and don't forget this week's give away for Sharing on Sunday (Christmas in July).
space
Talk to you soon,
~Karen~
Snowball Night...Squaring Them Up
Hope everyone who joined the Snowball Night is still sewing away each week. Your pile of snowballs is growing, waiting to be sewn together in the future. Before you sew them together, you might need to square them up. I've had a few emails about this, so thought I would do a post with a few pictures to help.


I do this check on all 4 sides.

The right side of the ruler is where I will be doing the trimming. Make sure the ruler is even with the original square.

See the excess of the black corner square.

That's what you need to trim. Do that on all sides, but always keep the original size of the background block.

I do the same for blocks that are larger than my 6 inch ruler. This block is 8 1/2"

Just square up the block on the top, bottom and the right side.

here's the bottom of the 8 1/2" block...

and here's the top all lined up.

Now just trim up the corners.

Here is the other tip for sewing on the corners so you won't have a block that is too small or shorter corner squares.
space

sew just a hair over the line (towards the corner). See where I'm pointing.


This is a close up of the red thread that I sewed with.

That little extra bit helps with the folding over of the triangle. It takes into account for the thickness of your thread.

Hope this helps.
space
This is how I square up snowballs...if anyone else would like to share a post on how you might do it...let me know and I can share your link with everyone.
space
All of these tips are based on the fact that your original square is "square"...what I mean is, that it is cut to a true 5 inch square (or whatever size you are doing)
space
Here is one of the snowballs from my future I Spy quilt. The original background square is 5 inches. I sewed the four corners on and now I need to square them up.
space
There is another tip below for sewing the squares on so there is a little more fabric to trim rather than having too short a block. Better to trim than to throw a block away because it's way too small.
space

I place my 6 inch wide ruler on the block.

I make sure that all the lines of the original block are within the 5 inch size.

I do this check on all 4 sides.

The right side of the ruler is where I will be doing the trimming. Make sure the ruler is even with the original square.

See the excess of the black corner square.

That's what you need to trim. Do that on all sides, but always keep the original size of the background block.
I do the same for blocks that are larger than my 6 inch ruler. This block is 8 1/2"

Just square up the block on the top, bottom and the right side.

here's the bottom of the 8 1/2" block...

and here's the top all lined up.

Now just trim up the corners.

Here is the other tip for sewing on the corners so you won't have a block that is too small or shorter corner squares.
space
If you are using the diagonal line to sew on...

sew just a hair over the line (towards the corner). See where I'm pointing.


This is a close up of the red thread that I sewed with.
That little extra bit helps with the folding over of the triangle. It takes into account for the thickness of your thread.

Hope this helps.
space
Happy Sewing,
~Karen~
Subscribe to:
Posts (Atom)
Wisata Danau Toba - Sumatera Utara
Danau Toba adalah salah satu destinasi wisata alam terbesar di Indonesia dan terletak di Sumatera Utara. Ini adalah danau vulkanik terbesar ...

-
 Danau Toba adalah salah satu destinasi wisata alam terbesar di Indonesia dan terletak di Sumatera Utara. Ini adalah danau vulkanik terbesar ...
 -
Ok, this is one of those "Thoughts on Thursdays where I have to say..."don't do this at home ladies" but... How many of y...
-
 In my last post about hexagons, I said I had "H.A."...Hexagon Addiction. Now I have H2O...Hexagon Habit Obsession!! Here's a p...