Ok...by the toilet paper controversy from last Thursday, I see you like the question of "this or that". Maybe I should call it "This or That Thursday", so here it is...
Your hobby time...do you do your best work in the morning or at night or any time you can get it?
I'm a night!
Happy this or that,
~Karen~
Thursday, June 16, 2011
Monday, June 13, 2011
Tool Time Tuesday...Kitchen Sponge Pincushion
Happy Tuesday! How would you like to make an adorable pincushion for 25 cents or less with scraps and a kitchen sponge?
You read it right...a kitchen sponge. Use a new one of course, because that would be gross if we didn't...LOL
Isn't she pretty? These would make great gifts for sewing friends for swaps, guilds, quilting bees, holidays etc

Here's where it started...in the dollar section of CVS. I know some dollar stores probably sell them more to a package for a dollar, so look there too.

4 sponges for $1.00

Ok this is the easiest project if we just used it as a pincushion straight out of the package, but we like to create, sew, make things pretty...

So let's do it. Let's make it pretty. Measure the length.

and the width.

This sponge isn't very thick, but some are, so take the height of your sponge into consideration.

Now the creating part...use anything you have in your scrap bin. These are selvage edges of fabric that I won in a give away a loooong time ago. I knew I would use them at some point. This is why we NEVER throw things away.
Selvage or selvedge (Webster dictionary has it spelled both ways for this meaning) is a specially woven edge that prevents cloth from raveling.

Lay out the selvage strips, over lapping the raw edge just a little. Because the white part is woven, it won't unravel and can be left as a finished edge.

Pin all pieces in place...

Overlap the edges just a little to catch the bottom fabric when top stitching.

Just sew a straight stitch on top of the finished edge.

Here is a close up...see the stitching under the words "all right" ?

Sew 2 sections for the front and back of the pillow.

Trim to keep sections the same size according to the size of your sponge.

Now place sections right sides together and sew around the four sides leaving an opening to turn and stuff the sponge in.

Turn right side out.

Here's the opening...

Now stuff in the sponge..
Work in the corners of the sponge to fit the corners of your pincushion cover.

Pin the opening closed and either machine stitch closed or hand whip it.

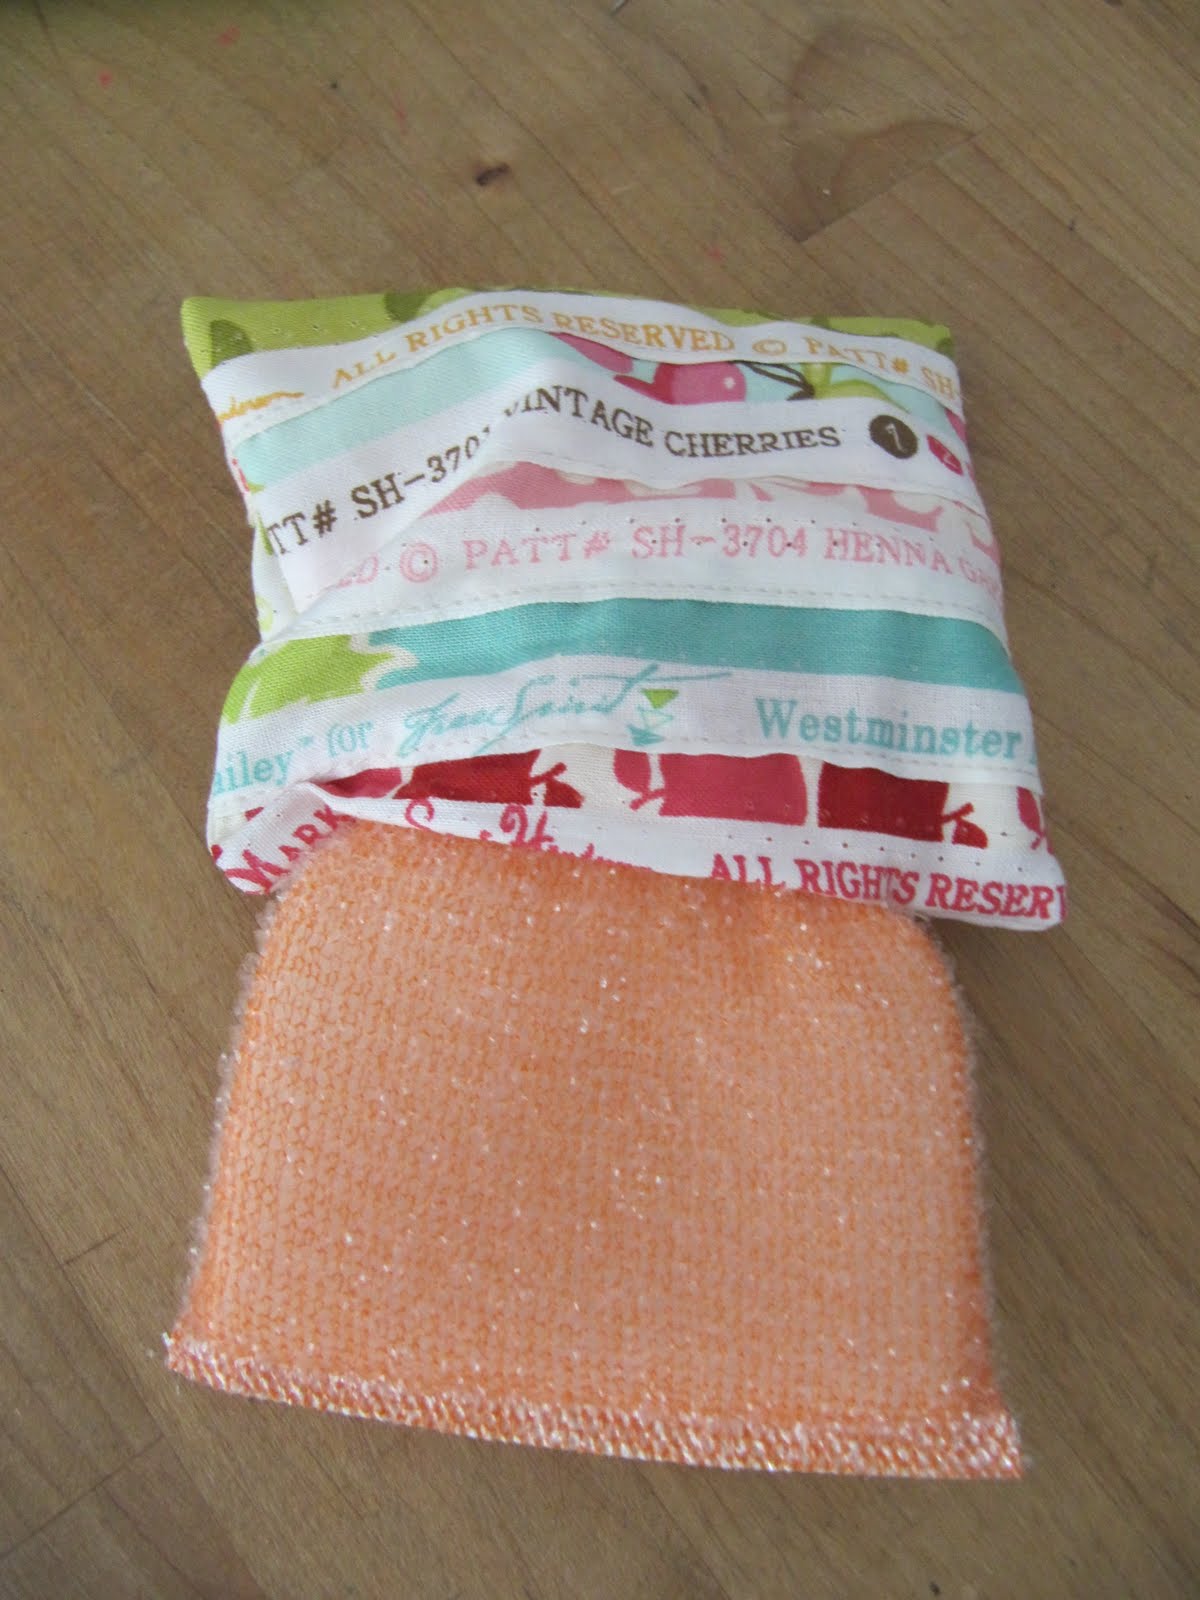
Here is one side.

and here is the other.

Just perfect and practically free.

A lesson learned...never throw out scraps.

You can also make a thicker pincushion by using 2 sponges on top of each other or by folding the sponge in half and stitch it to hold.

It will make a smaller, but thicker pincushion.

Now what to call a pincushion made from a sponge...
- spongecushion
- spincushion
- pinkitchen
Have a great Tuesday,
~Karen~
Sunday, June 12, 2011
Blog Buddy...How To Add A Button To Your Blog

Welcome to another edition of Blog Buddy...the place to find helpful tips and tricks for your blog. I am not an expert, by any means, but I have learned a lot along the way (especially by making mistakes!)
I've had soooo many emails asking how to add a button to a blog. So today I thought I would show you how to "Grab a Button" from another blog to add to your side bar or to a post. You know I love pictures and they are worth a thousand words, so here are 17 pictures to show you a quick and easy process.
First, find the button you'd like to have on your blog. Some will have "the code" underneath and some will not. Let's start with the code.
Click any picture below to enlarge...
These 2 buttons on my blog, that are circled in the picture, have the code.

Place your cursor at the beginning of the code...left click and drag the high light feature down to the end until the whole code is high lighted.
Right click on the high lighted part and click on COPY.

Now go to your dashboard and click on DESIGN.

Click ADD A GADGET...

Scroll down until you come to the choice that says...HTML/JAVASCRIPT. Click on that.

A second window will pop up.
- The TITLE section is what you want to say above the button...anything you'd like, the blog name etc
- place your cursor in the top left corner of the big empty box and right click in there and pick PASTE.
- that code you copied before should appear. If the word PASTE isn't there, just go back and copy the code again and come back to this box and try again.
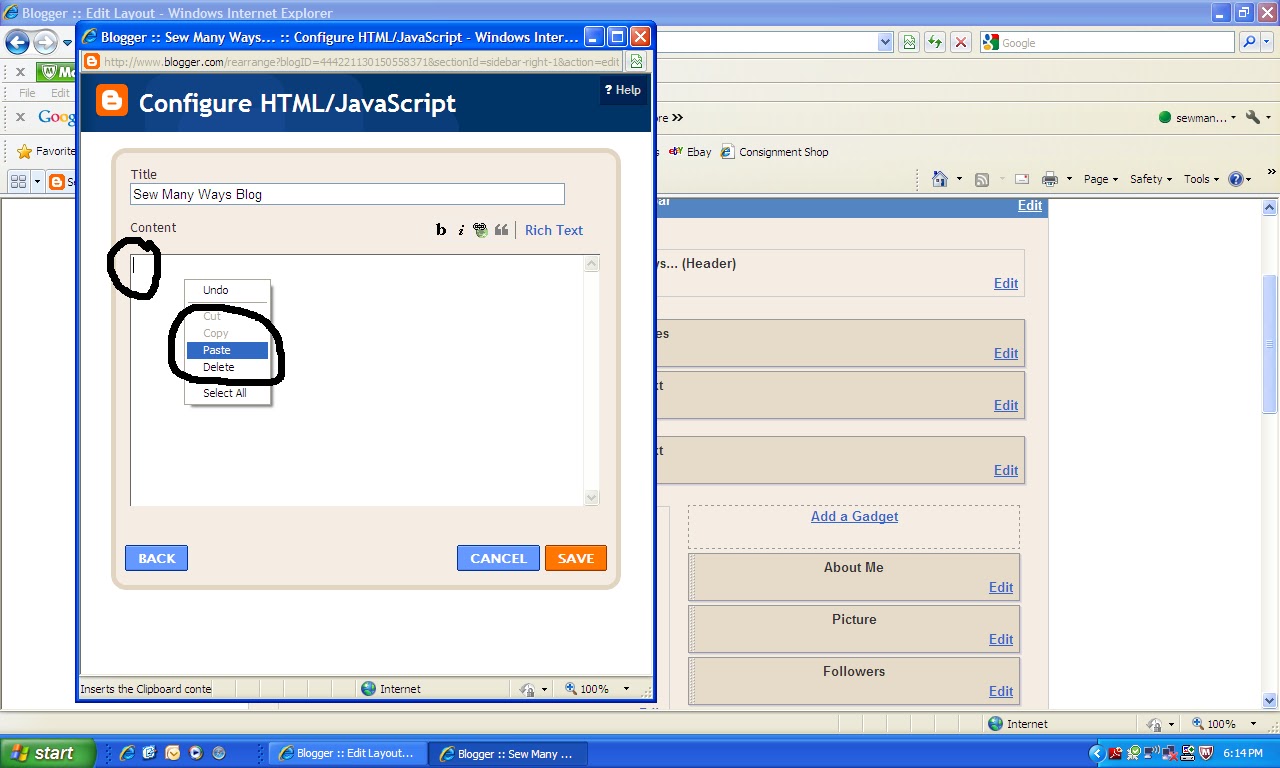
The code will be there, but make sure you click SAVE.

Now any gadget that you add to your blog will appear at the top of your side bar.

To move any gadget, just click on it and DRAG it to where you want.
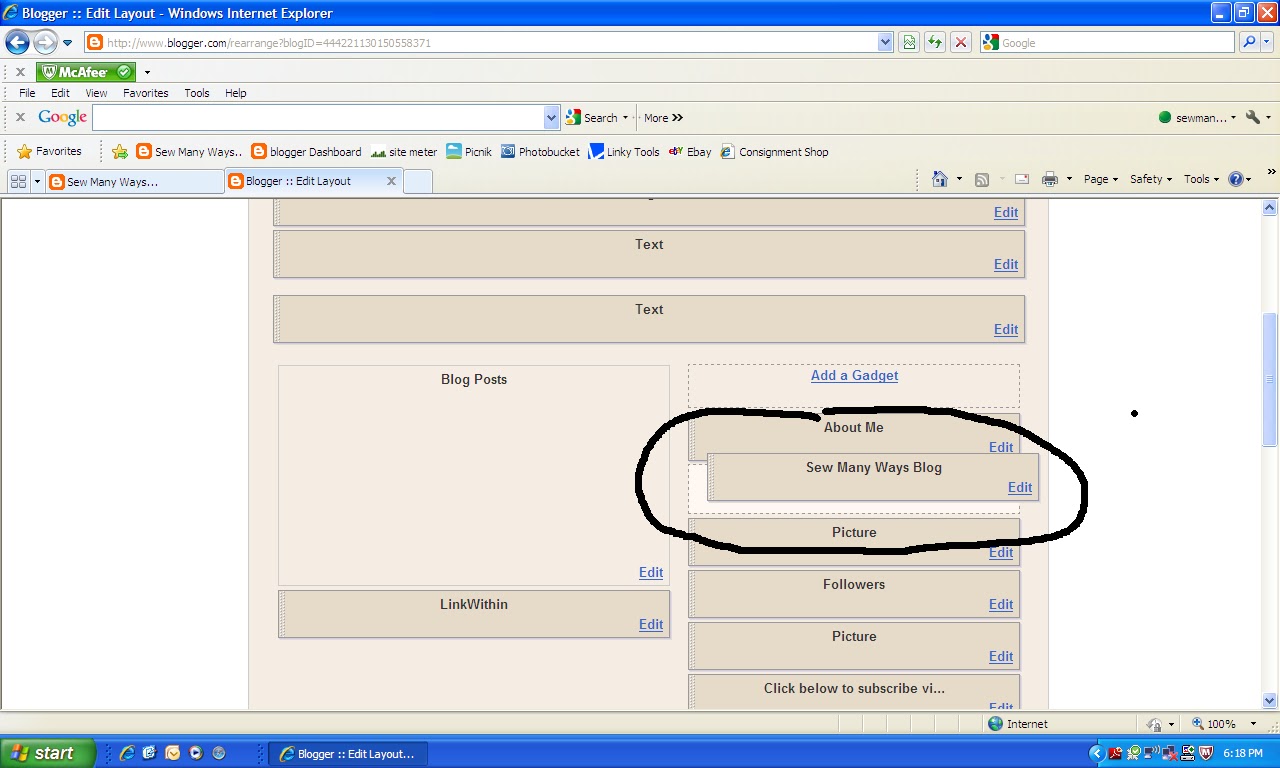
Make sure you click SAVE again after you have moved it into position.
Now you are all set!! A button that has a link back to that blog is now on your side bar. The code is the link back to that blog.

To add a coded button to your written post, just click on the HTML tab above the box you write a post in. You can do it before or after you start writing a post.
Just place the cursor where you want the button to be in the post and right click and PASTE that copied code.
To remove a button from the post, you can just click on it back in the COMPOSE tab and click REMOVE.

Now here is how to add a button if there isn't a code...
- Right click on the button you want
- click on "SAVE PICTURE AS" or what ever your computer says to save
- save it and remember where it is

Now go to the design section and the add a gadget button. Scroll down to PICTURE.

In this window...
- the TITLE is what is above the button or picture...like the blog name
- the CAPTION is what's below...like "great place to find recipes"
- the LINK is the address of the blog the button is from...just copy and paste it in there, but don't have 2 https in there if you copied it. The link address must be in there or the button won't work when you click on it. It will just be a static picture.
- now BROWSE from your computer to go get the picture you saved earlier. Wait for the picture to pop up in that box before you click save
- then click SAVE

Do the same thing to position it where you want. Click...

and drag into place. Don't forget to click SAVE...are you tired of me saying click SAVE !!

You can use that last "Picture" gadget to add any picture...not just a button picture. You can take a picture of one of your favorite posts from your blog and put a link to THAT post with that picture.
Hope you find this one helpful...
Happy Blogging,
~Karen~
Sew Darn Crafty Party...Week 18
It's Sew Darn Crafty Sunday...Sew, for anything sewing...Darn, for anything knitting and Crafty, well, that's just every thing else we do in life. I think we all have to be crafty these days to turn "ok" things into GREAT things. SDC is the start of a week long linking party to share the most wonderful projects, ideas, tips, vacations, dinner/desserts recipes etc.
This week, my project is to get my oldest daughter's room pulled apart to switch out a twin bed to a queen bed and paint the room too. However, a ton of college stuff still packed in boxes and an explosion of clothes is keeping me from it. I'm doing the prep work in the basement...painting the queen bed frame, getting other furniture ready and trying to move things out. This is my SDC project this week...we'll see how far I get and then I'll share it with you.
So let's see what you were up to last week...and don't forget to take pictures of projects you do this week, so you can link up next Sunday too!

Sew Darn Crafty is all about YOU!! Show off your projects, share a tutorial, show us your vacation pictures, share a family favorite recipe...share anything. Not only does linking inspire us all, it also brings lots of new people to your blog for a visit. Click here for past parties and lots of inspiration
Easy steps to join in on the fun...
- link up to the specific project post, not your whole blog. Makes it easier to link right to that post and not search through all your whole blog. To find the http address to a specific post, just click on the Title of your post.
- link as many projects as you'd like...old or new
- anything goes...cooking, sewing, knitting, crafts, organizing, remodeling projects etc...
- visit other links to share some blogging love! You know we all love comments!
- grab a Sew Darn Crafty button for your blog (on my right side bar) or just link to the party in your post.
- the more we share, the more people will join and then there's more inspiration to look at!
- linking is open til Saturday night, so plenty of time to join in
- just click the "click here to enter" button and follow the easy steps
Have fun linking up! Don't forget to come back and take a look at all the great projects during the week,
~Karen~
Subscribe to:
Posts (Atom)
Wisata Danau Toba - Sumatera Utara
Danau Toba adalah salah satu destinasi wisata alam terbesar di Indonesia dan terletak di Sumatera Utara. Ini adalah danau vulkanik terbesar ...

-
Ok, this is one of those "Thoughts on Thursdays where I have to say..."don't do this at home ladies" but... How many of y...
-
 Danau Toba adalah salah satu destinasi wisata alam terbesar di Indonesia dan terletak di Sumatera Utara. Ini adalah danau vulkanik terbesar ...
 -
 In my last post about hexagons, I said I had "H.A."...Hexagon Addiction. Now I have H2O...Hexagon Habit Obsession!! Here's a p...